

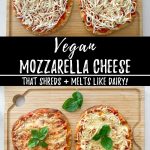
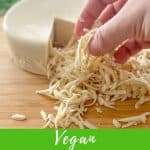
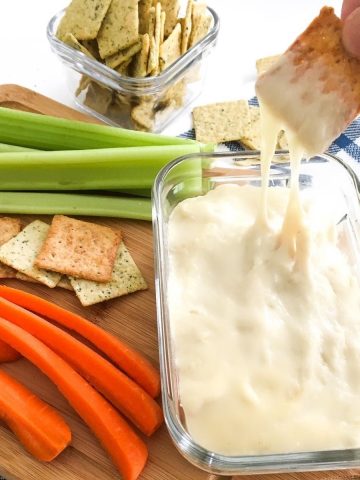
A vegan cheese that slices, shreds, and melts just like dairy mozzarella!! You won’t believe your eyes (or your taste buds). This is nothing short of amazing and so easily made oil free and nut free, if needed.

Vegan cheese is a tricky concept and something that can be hard to duplicate, but these options will have you doing a happy dance!
This recipe was inspired by my stretchy vegan mozzarella cheese and numerous other cheeses on the web. I didn’t invent the wheel here, but I’ve tested this in a variety of different ways so I could share the absolute best, melty results with you!
Jump to:
Why you’ll love this
- It’s SO easy to make and ready faster than you could get to the store to buy some vegan cheese shreds.
- Tastes WAY better than any store bought plant based cheese I’ve ever bought.
- This is not only meltable vegan cheese, but it slices, grates and shreds like REAL cheese!
- Perfect on pizza, in a grilled cheese sandwich, topped on mac n cheese, or even sliced on a charcuterie board!
- Not only is this meltable cheese vegan, but it’s gluten free, and has a tested oil free option, too. It’s also allergen friendly and works with sunflower seeds if you need it to be nut free.
Ingredients + Substitutions
Here’s what you’ll need:
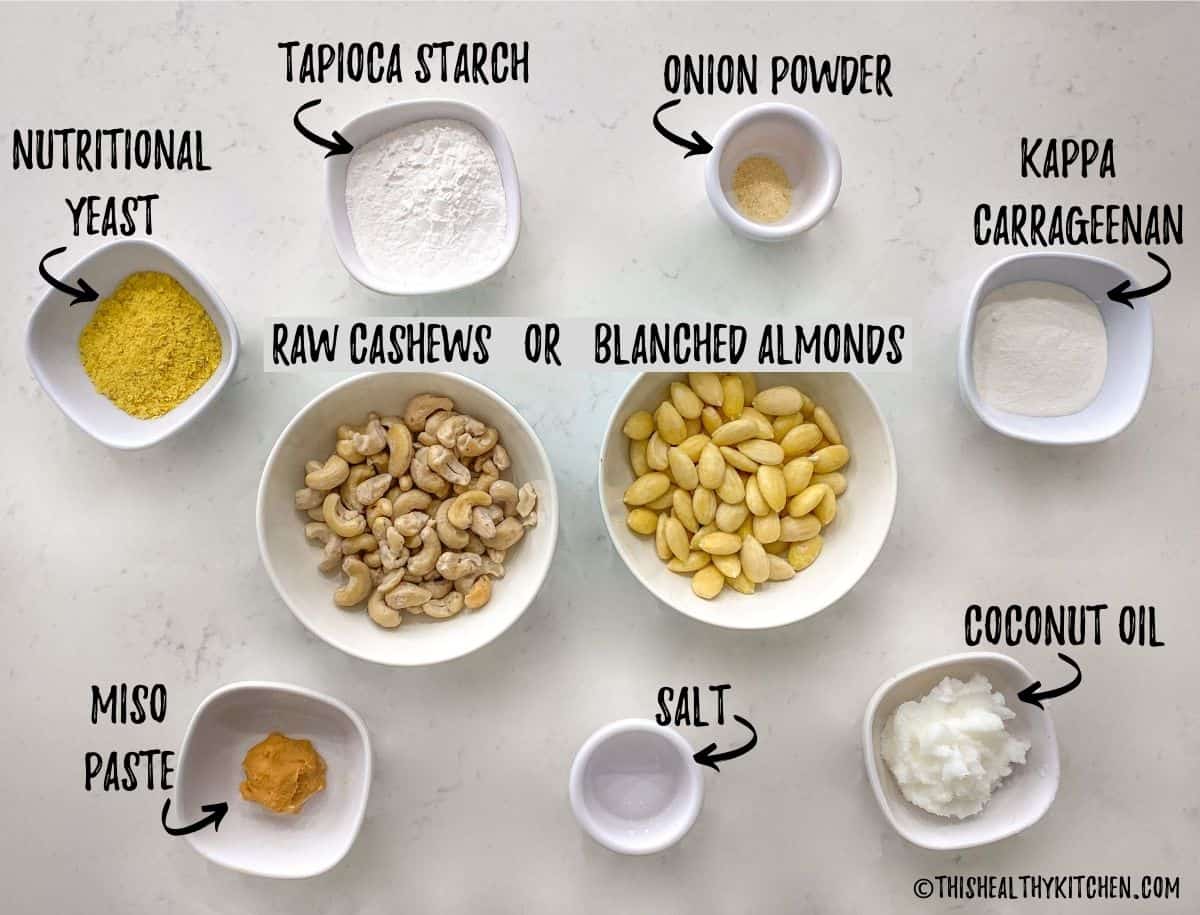
- Almonds OR Cashews: Both have been tested and both work very well with only a subtle flavour difference. I found the almond version to be slightly more rich in flavour.
- Make sure to use BLANCHED almonds and if you don’t have any, you may blanch your own almonds following the directions in the notes below.
- For nut free use raw sunflower seeds instead.
- Nutritional yeast: For cheesy and umami flavour. You can skip it if you must, but since it’s a small amount, I recommend keeping it in, if you can.
- Tapioca starch (or powder): This gives your dairy-free cheese a stretchy element and I do not recommend using another thickener in its place.
- Miso paste: Adds umami flavour and saltiness to your cheese. If you cannot have soy, you may omit and add an additional half teaspoon of salt, instead.
- Coconut oil: If using, make sure to use refined, NOT unrefined. Unrefined has a coconut flavour which you don’t want pressent in your meltable vegan cheese.
- For oil free: Skip the coconut oil and replace with ¼ cup of water to make up the liquid portion of the recipe. I’ve tested this with and without the oil (check out the oil free vegan cheese test below) and you absolutely CAN skip it.
- Onion powder: This does not make your cheese taste oniony. It’s a small amount used for added flavour and if you’re so inclined, add a sprinkle of garlic powder, black pepper or other favourite herbs to jazz it up.
- Kappa carrageenan: Make sure to use ‘food grade’ powder only which is extracted from red seaweed. There is some controversy over the use of carrageenan, but I feel safe consuming it after extensive reading on the subject. If you’re unsure, do your own research or speak to your doctor before using.
- If you prefer to avoid kappa carrageenan, I’ve read that you may use double the amount (in this case 3 tablespoons) of agar agar instead. Now I haven’t tested it this way and cannot speak to the way it shreds or melts, but several sources state it works, albeit, not as well as kappa.
- Boiling hot water: This is key to activating the kappa carrageenan, so make sure to use boiling hot, not warm or cool.
Instructions
(This is a summary with step by step photos, full recipe measurements and instructions are in the recipe card below.)
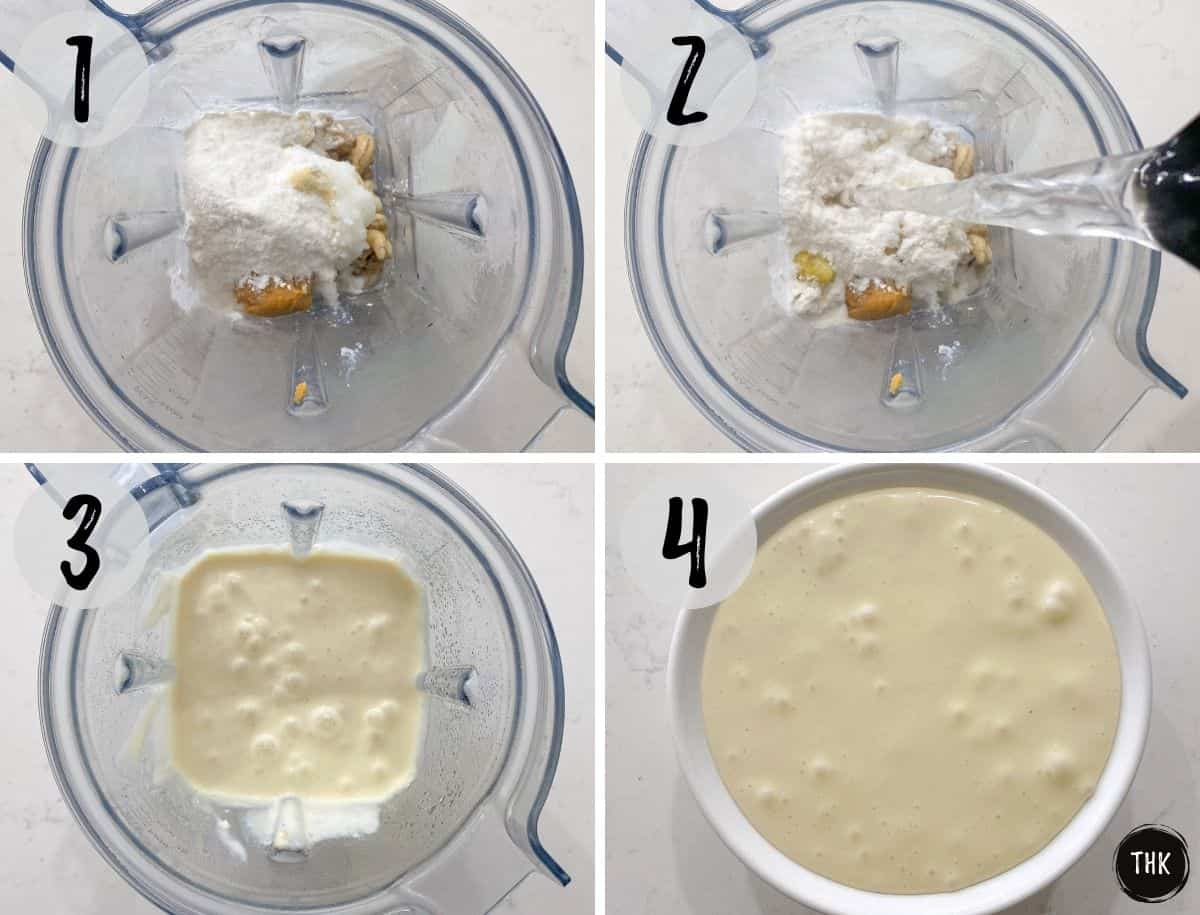
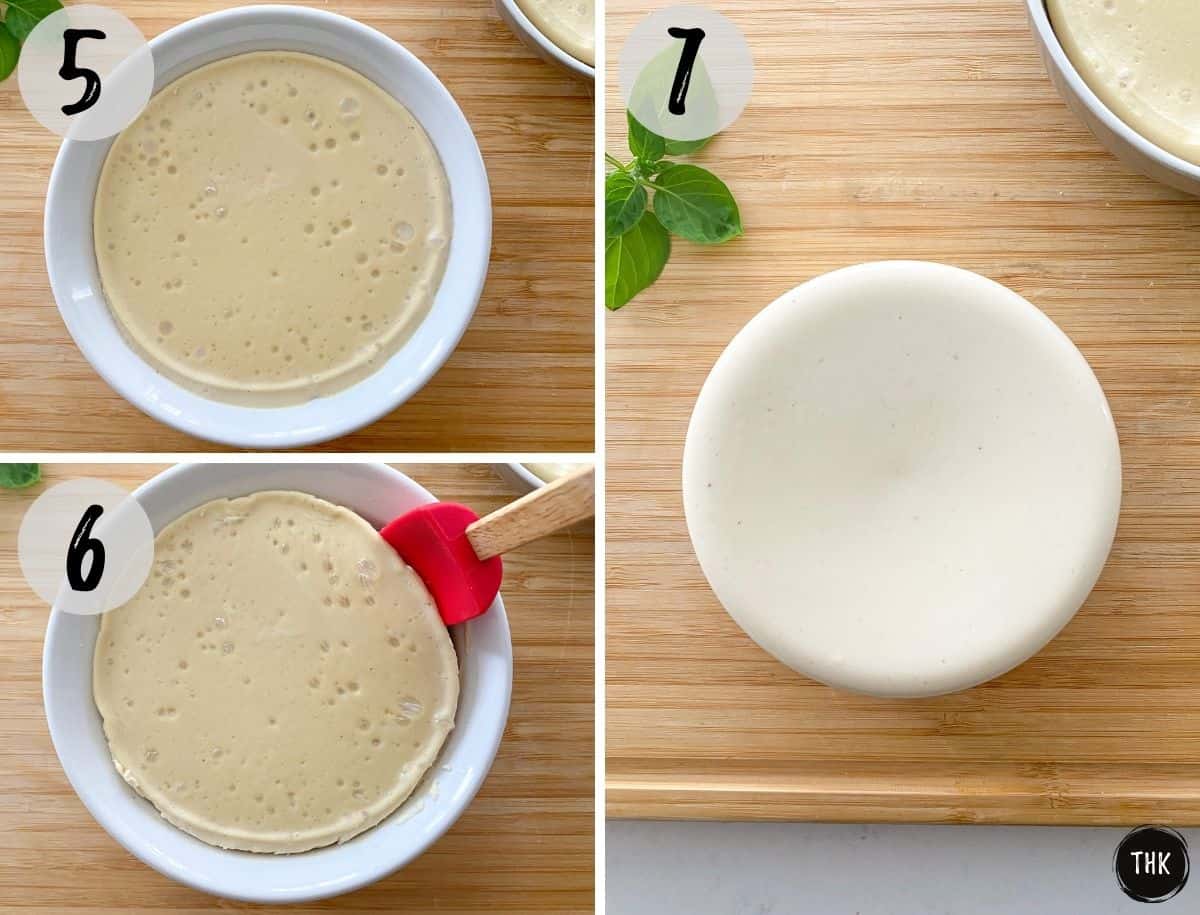
Place your soaked and drained almonds or cashews in your blender along with all remaining ingredients EXCEPT the boiling hot water. (photo 1)
Once everything else is in the blender, pour the 1.5 cups of boiling hot water and blend immediately, until smooth. (photos 2-3)
Quickly pour the liquid into a heatproof dish and refrigerate. (photo 4)
NOTE: Work fast! Once the kappa carrageenan is activated by the hot water it will begin to set quickly.
Once the cheese is set (this will take a couple of hours in the fridge) run a silicone spatula, or butter knife around the edges, to make sure it’s not stuck to your dish. (photos 5-6)
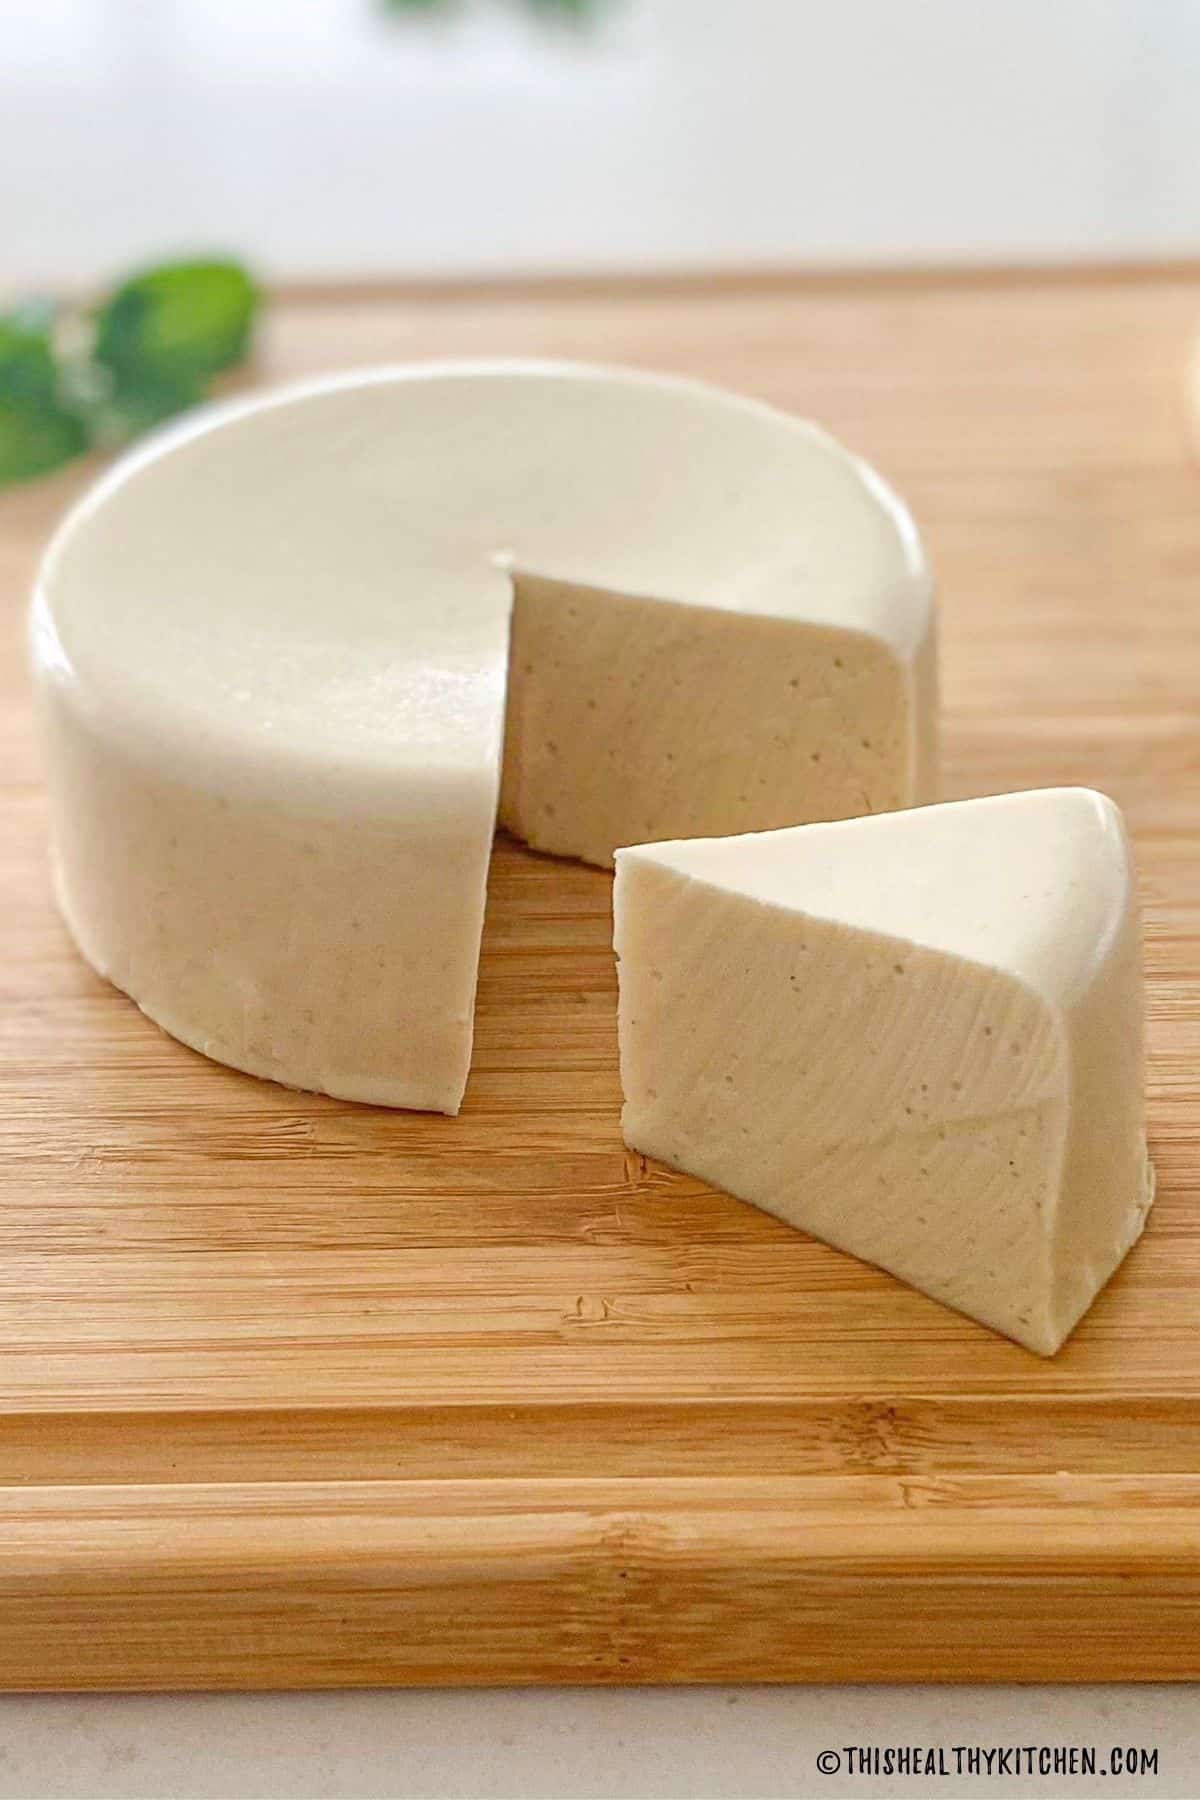
Then tip the dish upside down over a clean surface, like a cutting board, to pop it out.
Voila!!
You made shreddable, meltable vegan cheese!
Now slice or shred to use in a variety of delicious vegan dishes!
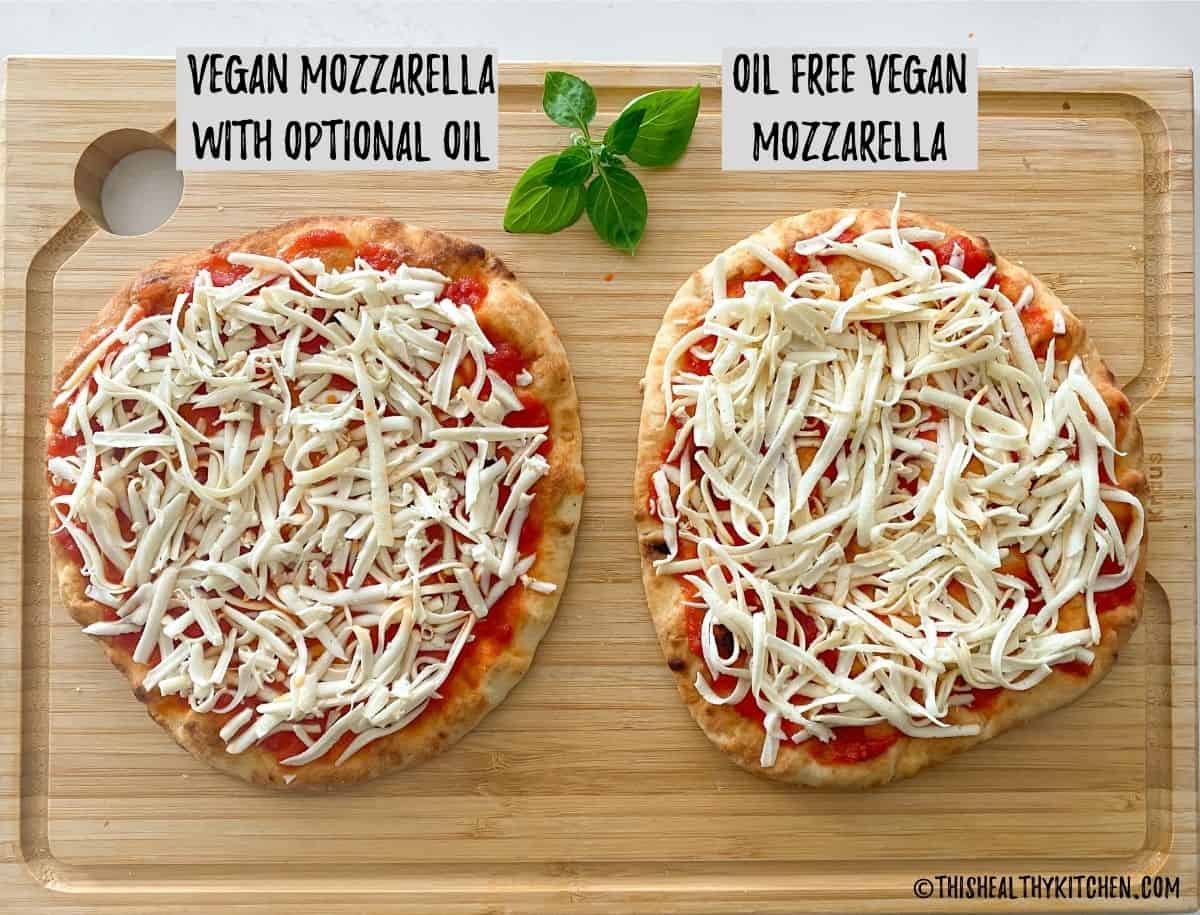
Oil Free Vegan Cheese Test
The Shred Test
At the request of many readers, I tested a shreddable vegan cheese without any oil at all.
Here’s a side-by-side comparison of both options. They were both easy to shred, with little to no difference in appearance or ability to grate.
The Melt Test
I tested their meltable-ness on two store-bought flatbreads that baked in the oven side by side, at the same time at the same temperature.
While both versions melted, there is a clear visible difference as you can see. The oil version of the vegan cheese melts just like dairy cheese while the oil free version melted a little less.
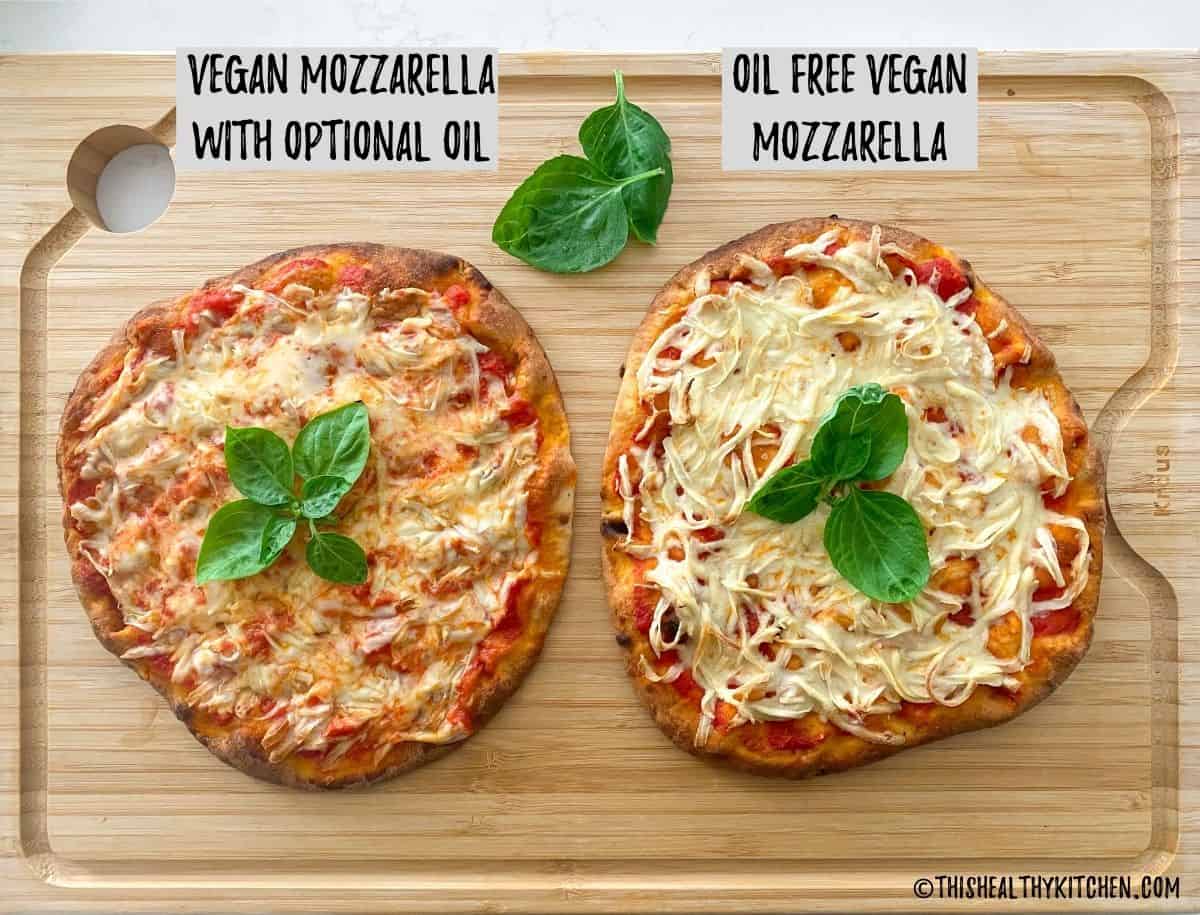
The Taste Test
When tasting the sliced cheese, there was some difference that all my taste testers noted.
The oil version is creamier and richer in taste and texture when used cold/sliced and unmelted.
However, when it came to the pizza taste test, neither myself nor my taste testers (AKA Mr. Healthy Kitchen, my two boys, and mom) could taste a difference! Woohoo!!
So although they are visibly different when melted, both flatbreads were devoured in no time and there was no preference for one or the other in terms of flavour. (And that was without any other toppings to mask the cheese.)
This meltable vegan cheese is approved by kids and adults alike! Happy dance!
Equipment
You need a good blender (I like using my Vitamix) and a heatproof dish or glass container that holds about 3 cups of liquid.
Can I use unblanched almonds?
No, but if you don’t have blanched almonds, you can blanch them quite easily.
How to Blanch Almonds
- Bring a small pot of water (enough to cover the almonds) to a boil.
- Once boiling, add the almonds and boil for 1 minute.
- Then drain and rinse with cold water to cool them down, enough to handle.
- Now pinch the almonds using 2 fingers and the skins will come right off.
Storage
Your meltable vegan cheese will keep refrigerated for 5-7 days.
Or you may freeze it (whole or shredded) in a freezer-safe airtight container or zip top bag for up to 3 months.
Expert Tips
- Even if you have a high-speed blender, I recommend soaking your almonds or cashews first. Doing so will help them blend up much faster so you can quickly pour the mixture out before the cheese begins to set.
- Move quickly!! Once you add the boiling water to your blender, the mixture will start to thicken. Immediately pour into your heatproof dish once blended smooth.
- Make sure to use blanched almonds. If you don’t have blanched almonds you can blanch whole almonds yourself, quite easily. See above for how to blanch almonds.
More vegan cheese recipes
If you tried this recipe, please let me know about it in the comments below. I always love hearing from you! Don't forget to Subscribe to This Healthy Kitchen to be among the first to get my new recipes! You can also FOLLOW ME on Facebook, Instagram, Pinterest and Twitter to see more delicious food and get all the latest updates.
Buon appetito
Rosa
📖 Recipe

Equipment
Ingredients
- ½ cup blanched almonds or raw cashews or sunflower seeds
- 4 tablespoons tapioca flour
- 2 tablespoons nutritional yeast
- 1.5 tablespoons kappa carrageenan
- 1 tablespoon white miso paste
- 1 tablespoon white vinegar
- ½ teaspoon sea salt
- ¼ teaspoon onion powder
- 4 tablespoons refined coconut oil optional, see notes
- 1.5 cups boiling hot water
Instructions
- Soak your almonds or cashews in hot water for 15 minutes and then drain.
- Meanwhile, place additional water on the stove top or in a kettle to bring to a boil. You will need 1.5 cups of boiled water, so add a little extra to make up for any loss in evaporation.
- Find a heatproof dish, bowl, or container (glass, not plastic) that will hold approx. 3 cups of liquid and place beside your blender.
- Add everything EXCEPT the water to your blender and once the water is boiling, add 1.5 cups of the boiling water to your blender, on top of all the other ingredients and blend immediately until smooth.
- Pour the mixture into your heatproof dish and refrigerate for 3 hours or longer, until solid.
- Use a butter knife, or silicone spatula to run around the edges of your vegan cheese and separate from the dish. (See process shots above for a visual.) Then flip it over on a clean surface, such as a cutting board to pop it out of the dish.
- Now slice or shred your cheese for use in a variety of dishes.
bradley says
I am trying to avoid coconut oil, as it is extremely high in saturated fat. But I think the oil adds something. Do you think something like olive oil in place of coconut oil would work, making the cheese more meltable?
Rosa says
Hi Bradley, I haven’t tried this with olive oil, but it’s worth a shot.
Teresa says
This is my favorite go-to cheese – so easy to make and SO delicious!
Rosa says
Thanks for sharing, Teresa!
Yovanca Popovich says
Can I use Agar Agar in place of the carrageenan?
Rosa says
Instructions for this are listed in the Ingredients + Substitutions section of the post.
VeggieT8r says
Awesome mozz, and so much healthier and affordable than commercial versions! I made a few minor changes based on what I had… I skipped the vinegar and replaced it with 2 TBS of tart homemade oatgurt; I was a little short on cashews so added the remainder in hemp hearts for omega 3’s; and compromised on the saturated fat using 2 TBS of EVOO instead of the 4 of coconut oil. Also, since I don’t have a vitamix, I thoroughly blended all the ingredients first until really smooth, and THEN added the kappa carrageenan at the very end.
Once it set I wanted nice shreds, but I busted my wrist and the hand grater was off limits so… I cut it to fit into my food processor chute, and since I omitted the added solidity of the coconut oil, I put it in the freezer for just a bit to get it really firm, and it shredded perfectly! OMG, total game changer, I hate paying a fortune for commercial mystery shreds that too often taste like cardboard! Next time I’m making a double batch and freezing it for convenience! Thank you!
Rosa says
Wonderful! Thrilled you enjoyed it!
Anne Marie says
Hi. Do you think avocado oil would work in place of the coconut oil?
Rosa says
Hi Anne Marie, I haven’t tried this with avocado oil, so I can’t be certain, but I think it would work. Please let me know how it goes if you try it.
Lillian Hughes says
I often substitute white beans in place of cashews when making salad dressings. Do you think I could do so here? (Trying to save both money and calories…)
Rosa says
Hi Lillian, I have not tried this one with white beans so I can’t say for certain. I’ve tried cashews, blanched almonds, and sunflower seeds with great results.
Eric says
So far, so good! I’ve tried grilled cheese and burritos with this cheese and they were great. It’s very easy, too! I would advise folks to not double the recipe. While I will freeze it for later use, I ended up with a ton of this stuff. Well, glad I liked it! Now for the ultimate test: pizza!