


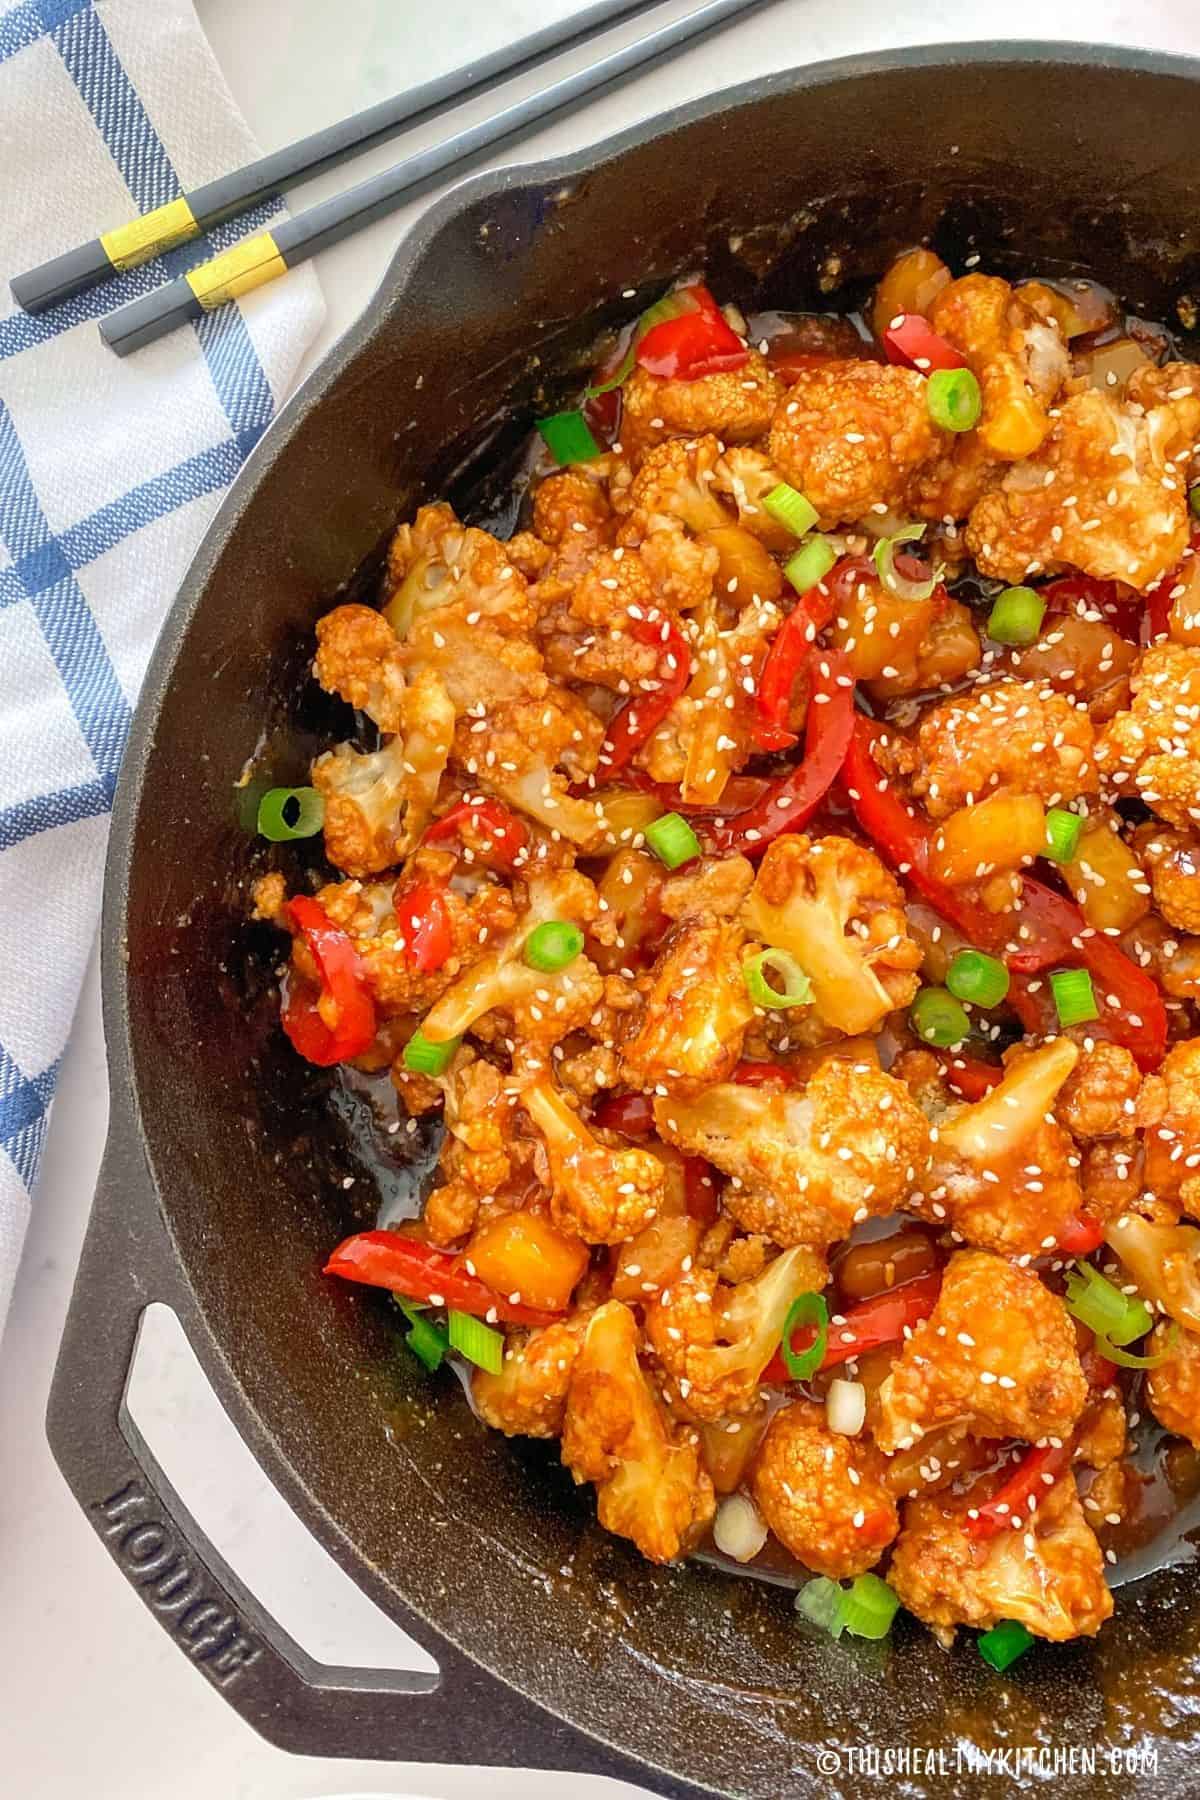
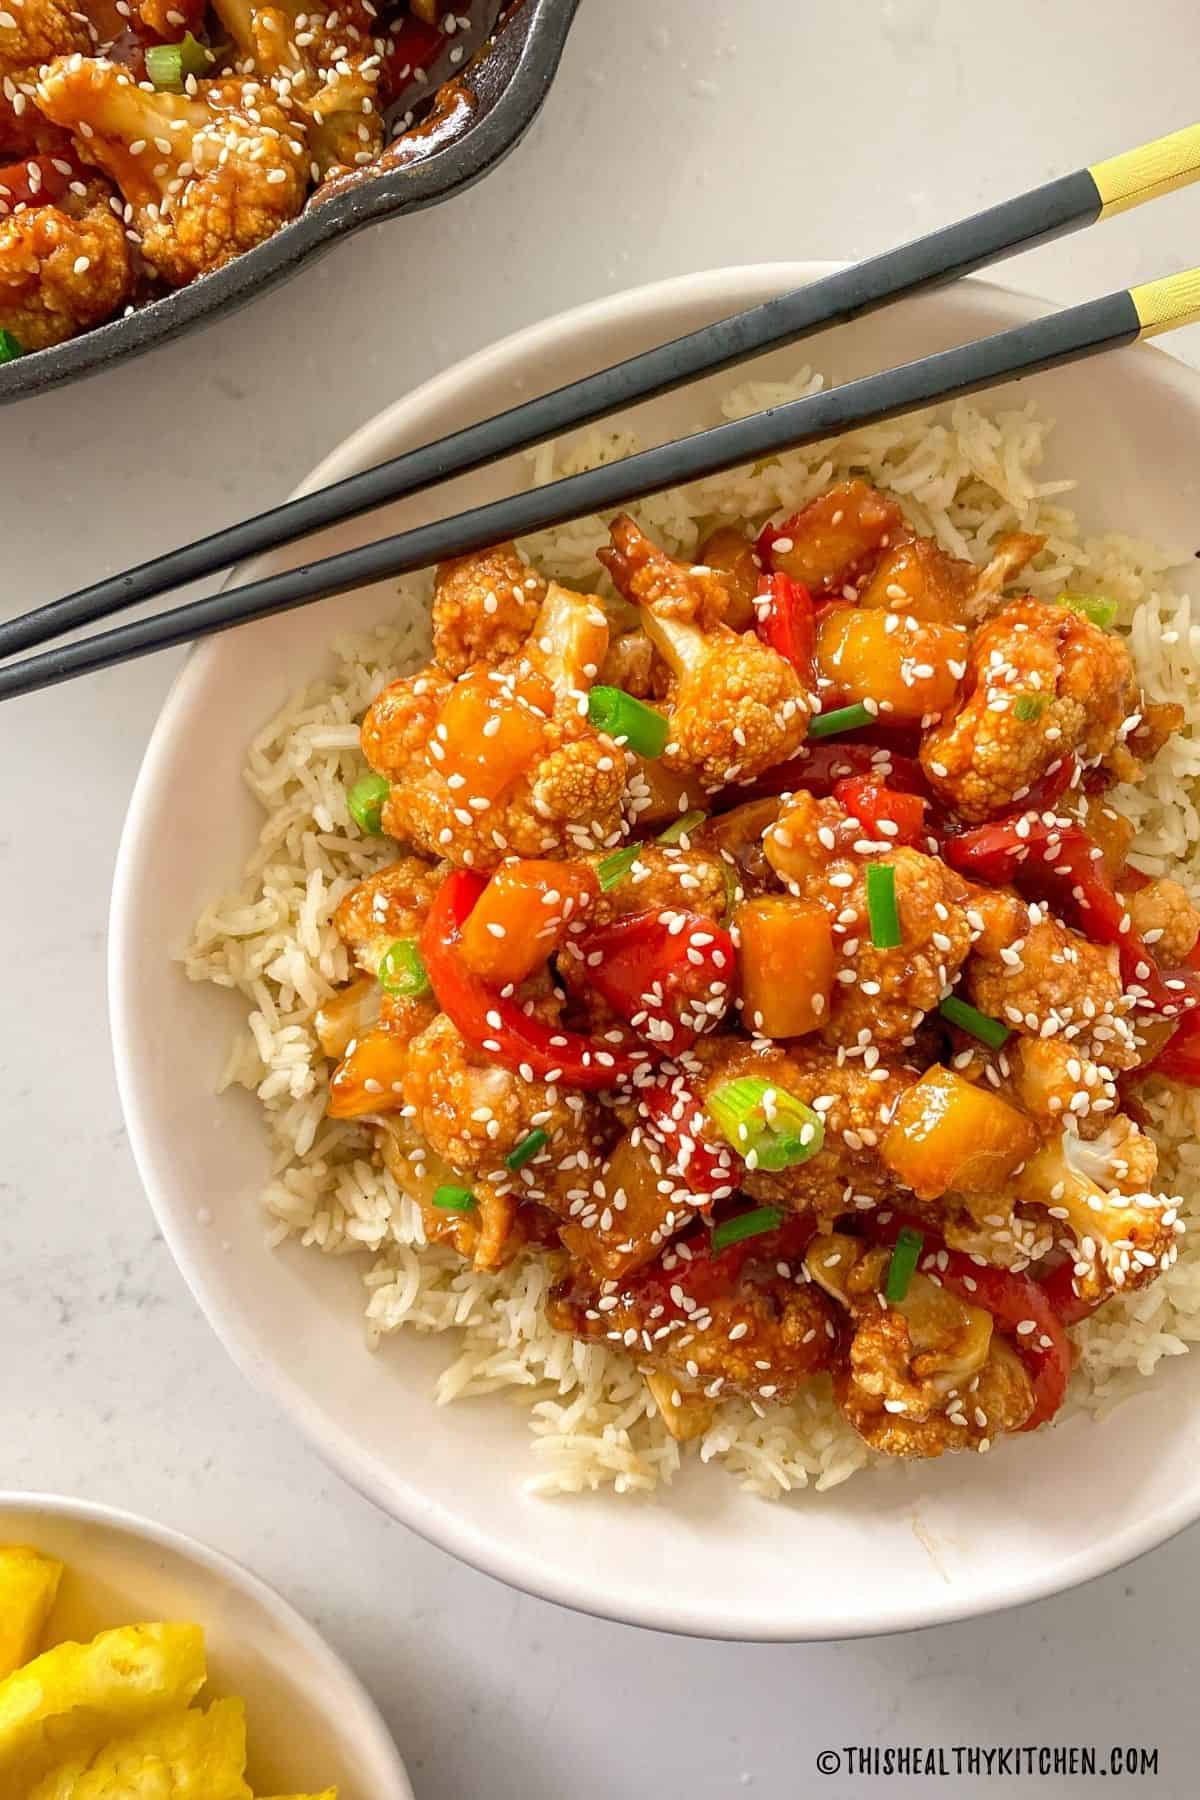
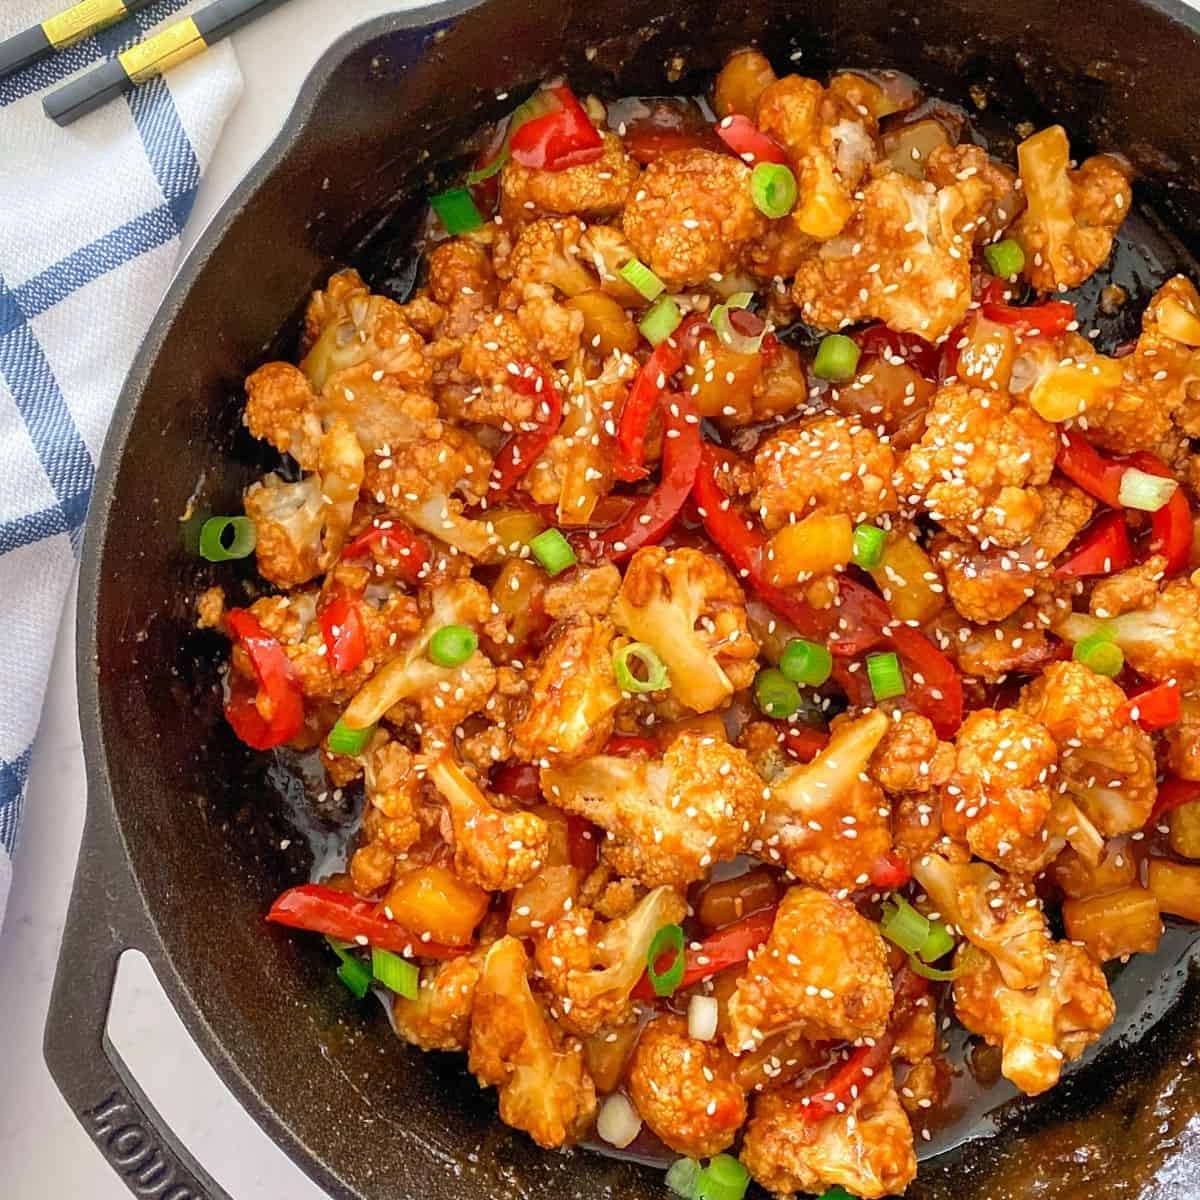
Another cauliflower win! This vegan sweet and sour cauliflower is sweet, sticky, and so incredibly delicious! Serve it over brown rice for the ultimate comfort dish that tastes WAY better than takeout.
The versatile cauliflower does it again!
From “wings“, to cheese sauce, to hearty bolognese, to rice, there’s not a whole lot that cauliflower can’t do! 😉
Jump to:
Why you’ll love it
- SO flavourful! The vegan sweet and sour sauce is unbelievably close to the real deal, but without using refined sugar.
- Wholesome, especially when compared to the original fried sweet and sour chicken version. This vegan twist is not only free from animal products, but it’s far healthier, much lower in calories, and virtually fat free, too. Woohoo!
- Versatile. This sweet and sour cauliflower recipe is absolutely delicious on its own to enjoy as an appetizer, or serve it up over a bed of brown rice or quinoa and make it a main course.
Ingredients + Substitutions
Here’s what you’ll need:
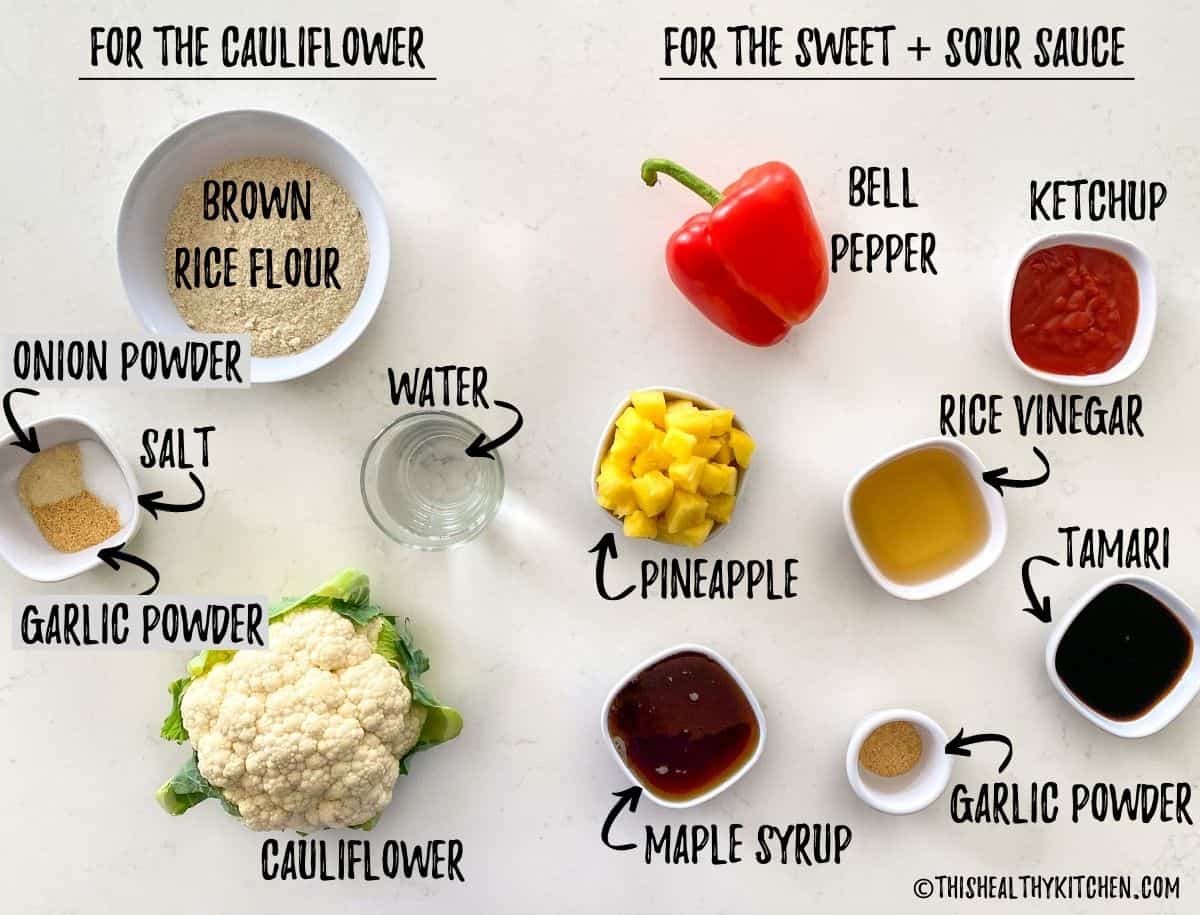
- Cauliflower: It wouldn’t be sweet and sour cauliflower, without the cauliflower. Choose a small head for this one, as you’ll only need four cups of bite sized florets. Or double up the sauce recipe if using a larger head. You could also try this with air fried extra firm tofu or broccoli florets if you prefer.
- Brown rice flour: This helps give the cauliflower a crispy crust when baking but still keeps the dish gluten free. If you don’t have any on hand, you can make your own by grinding rice in a powerful blender.
- Onion powder, garlic powder, salt, water: For flavour and making our batter.
- Bell pepper + pineapple: Adds lovely colour and flavour to the overall dish. You may choose any other colour of bell pepper, or use sliced red onion if you prefer.
- Ketchup: You may sub for a mixture of tomato paste and water if you prefer to avoid ketchup.
- Rice vinegar: Highly recommended, but if you don’t have any on hand, apple cider vinegar works as well.
- Tamari: Adds umami flavour and saltiness to the sauce. You may use regular soy sauce if you’re not avoiding gluten. Either way, choose low sodium to prevent the dish from being overly salty. You may also use coconut aminos for a soy free alternative.
- Maple syrup: Traditional sweet and sour sauce uses granulated sugar, but I particularly like the flavour of the maple here. You may also use date syrup, instead.
Instructions
(This is a summary with step by step photos, full recipe measurements and instructions are in the recipe card below.)
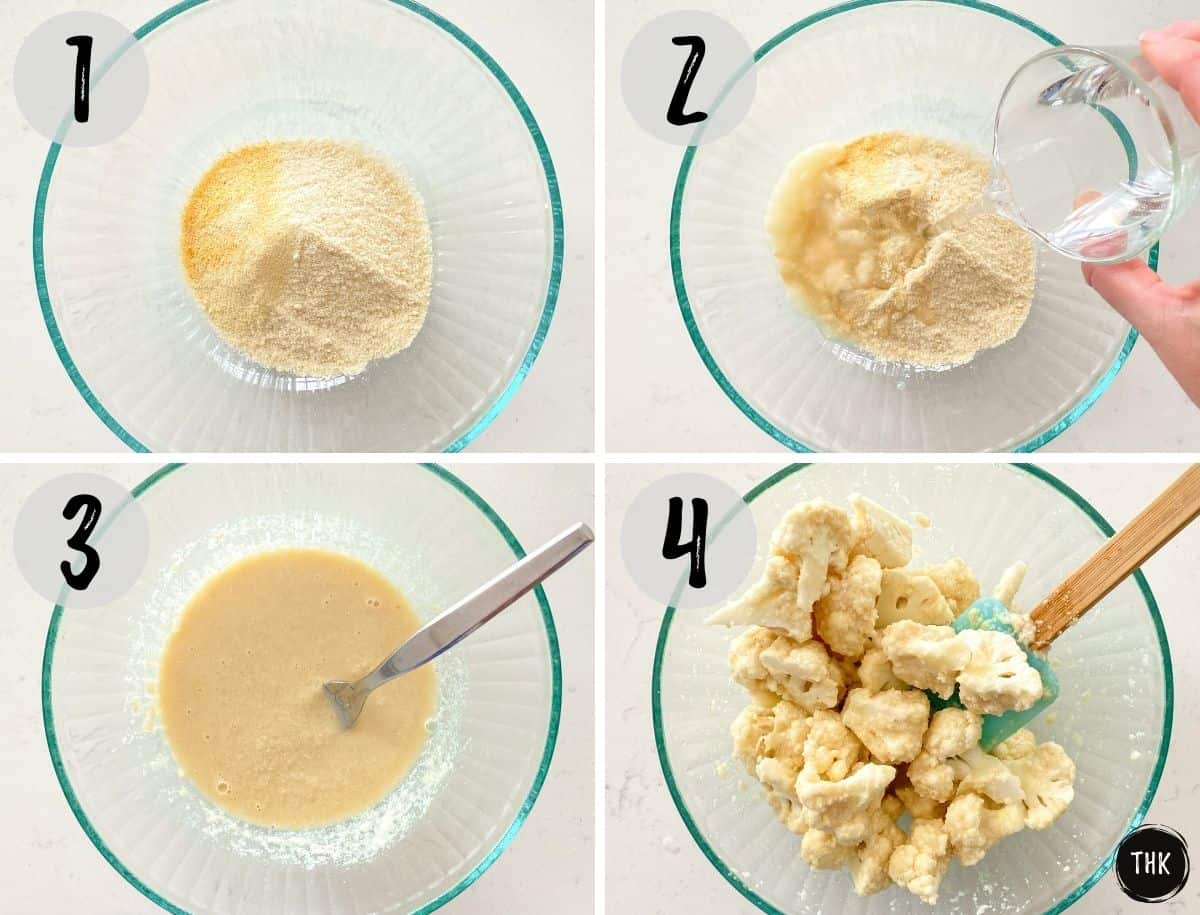
Begin by preparing your batter. Add the brown rice flour, seasoning and water to a medium mixing bowl. Stir to combine. (photos 1-3)
Then add the cut up cauliflower pieces to the batter and mix to evenly coat the pieces. (photo 4)
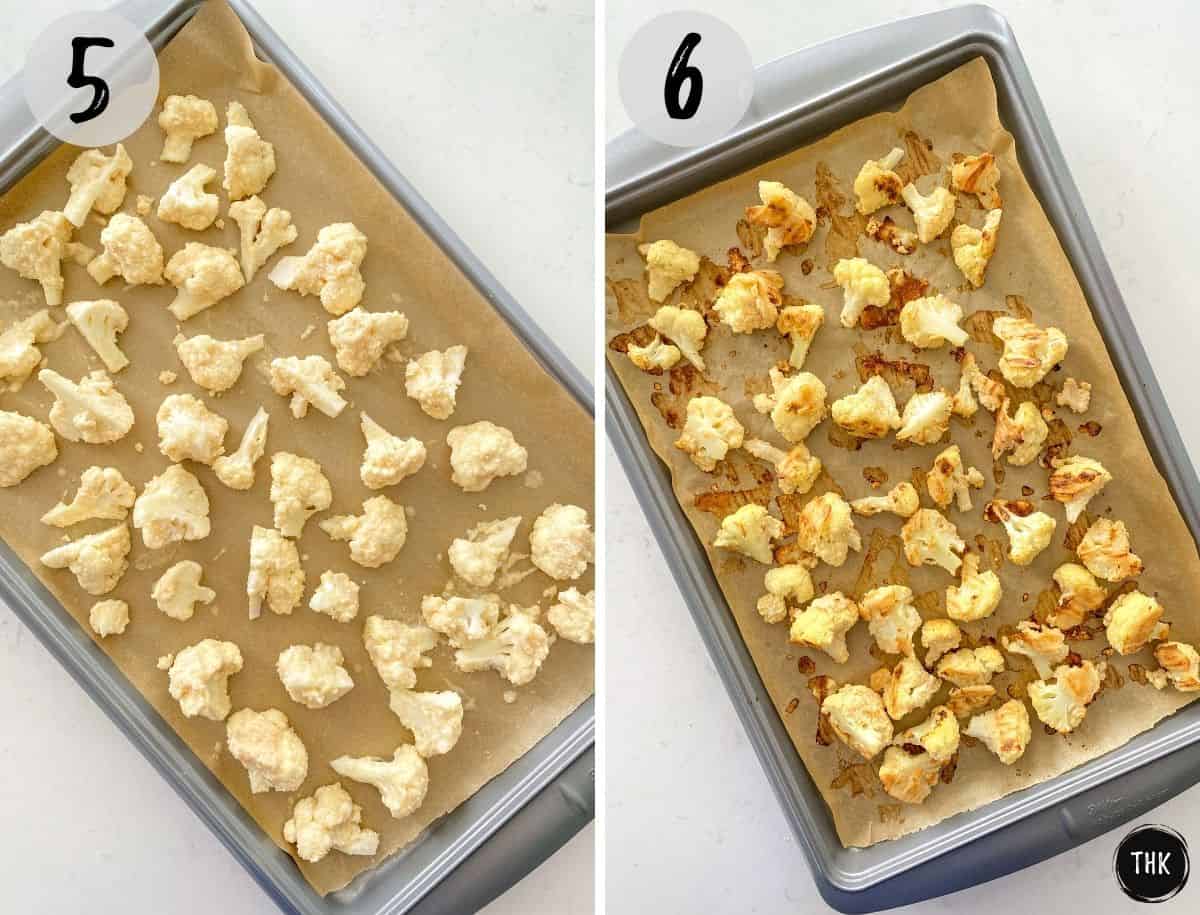
Arrange the coated cauliflower in a single layer, on a parchment-lined baking tray and bake for 20-25 minutes, flipping once at the halfway point. (photos 5-6)
NOTE: Do not dump the cauliflower onto the tray. You don’t want any excess batter on the tray, or it will stick to the tray, and pieces may stick to one another, reducing its crispy exterior.
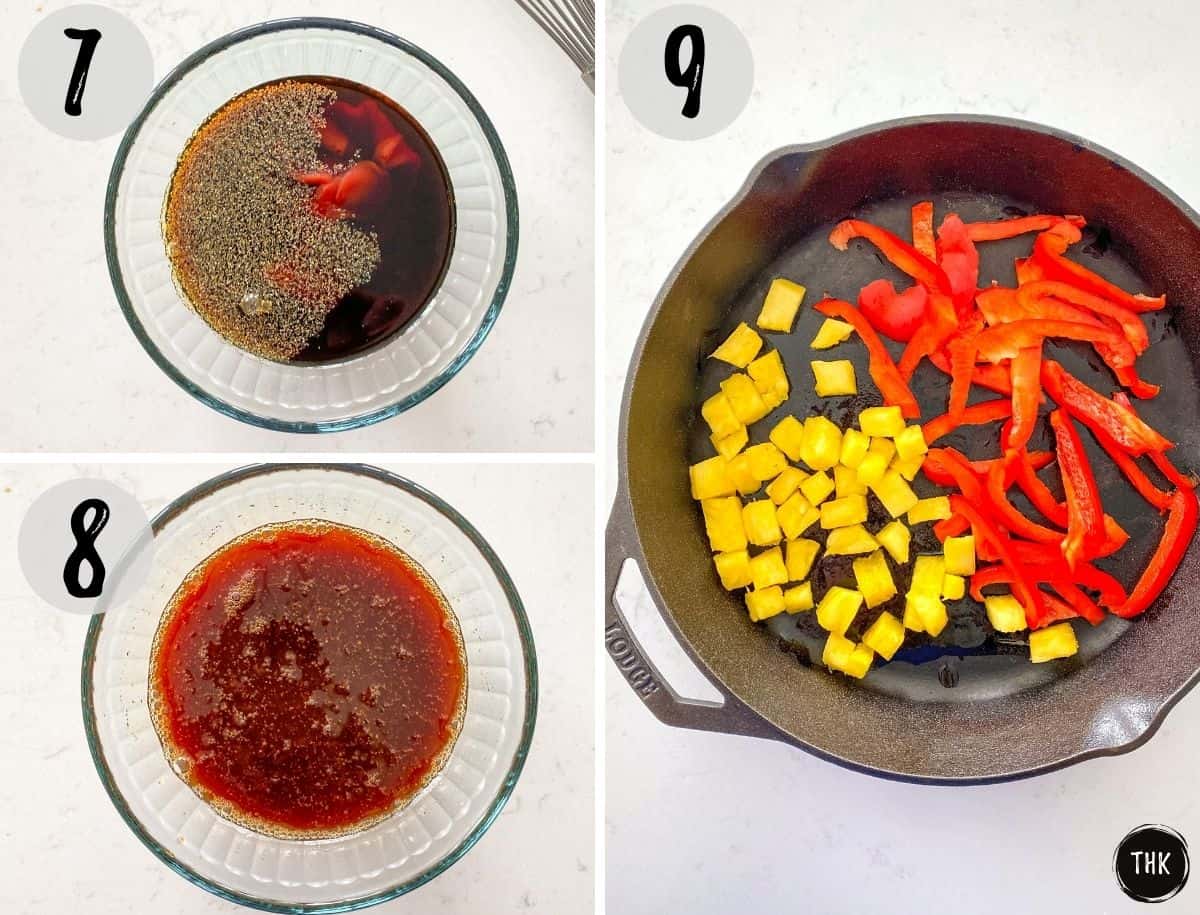
While the cauliflower is baking, prepare the vegan sweet and sour sauce. Whisk the ingredients in a small bowl and set aside. (photos 7-8)
Then “fry” the red pepper and pineapple chunks with water or broth until slightly brown. (photo 9)
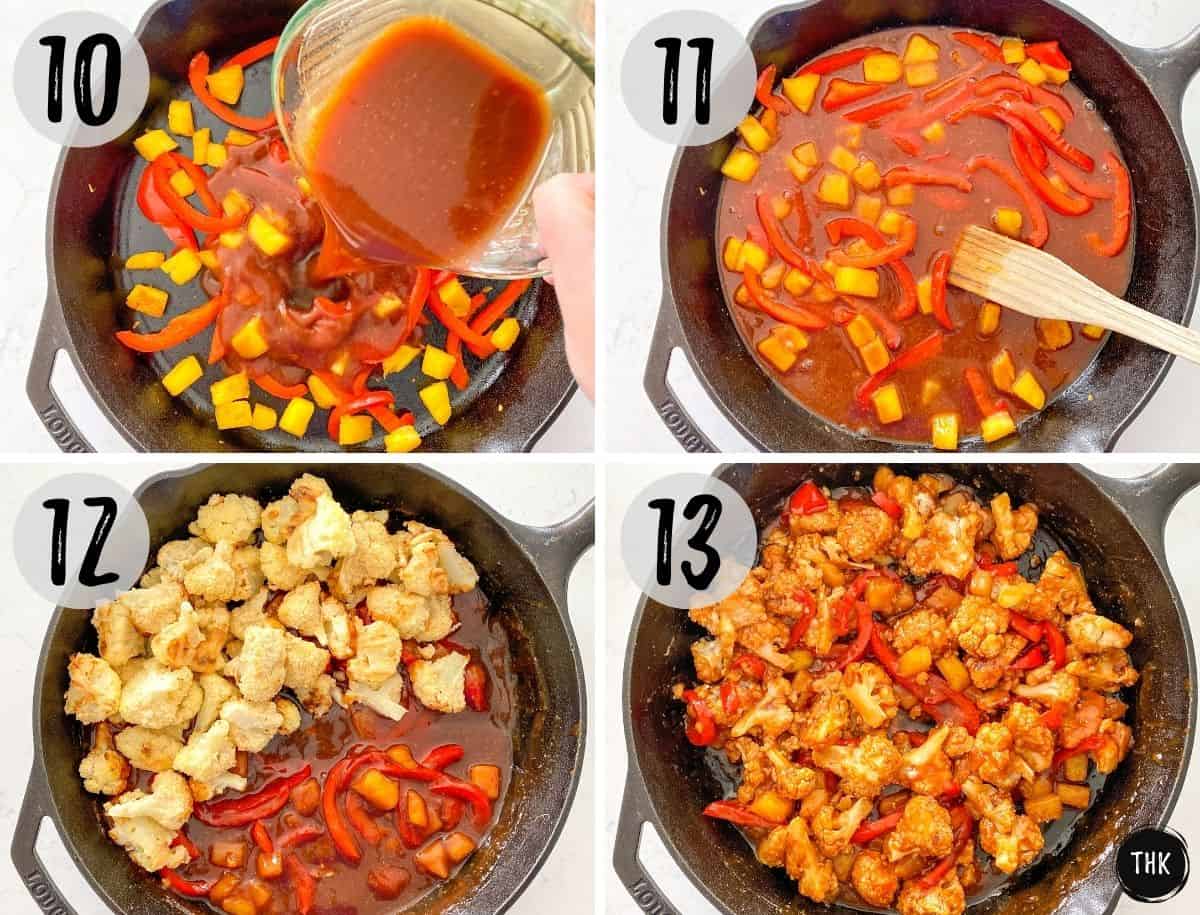
Pour the sauce into the pan and simmer until slightly thickened, approx. 5 minutes. (photos 10-11)
Then add the cauliflower to the pan and mix well. (photos 12-13)
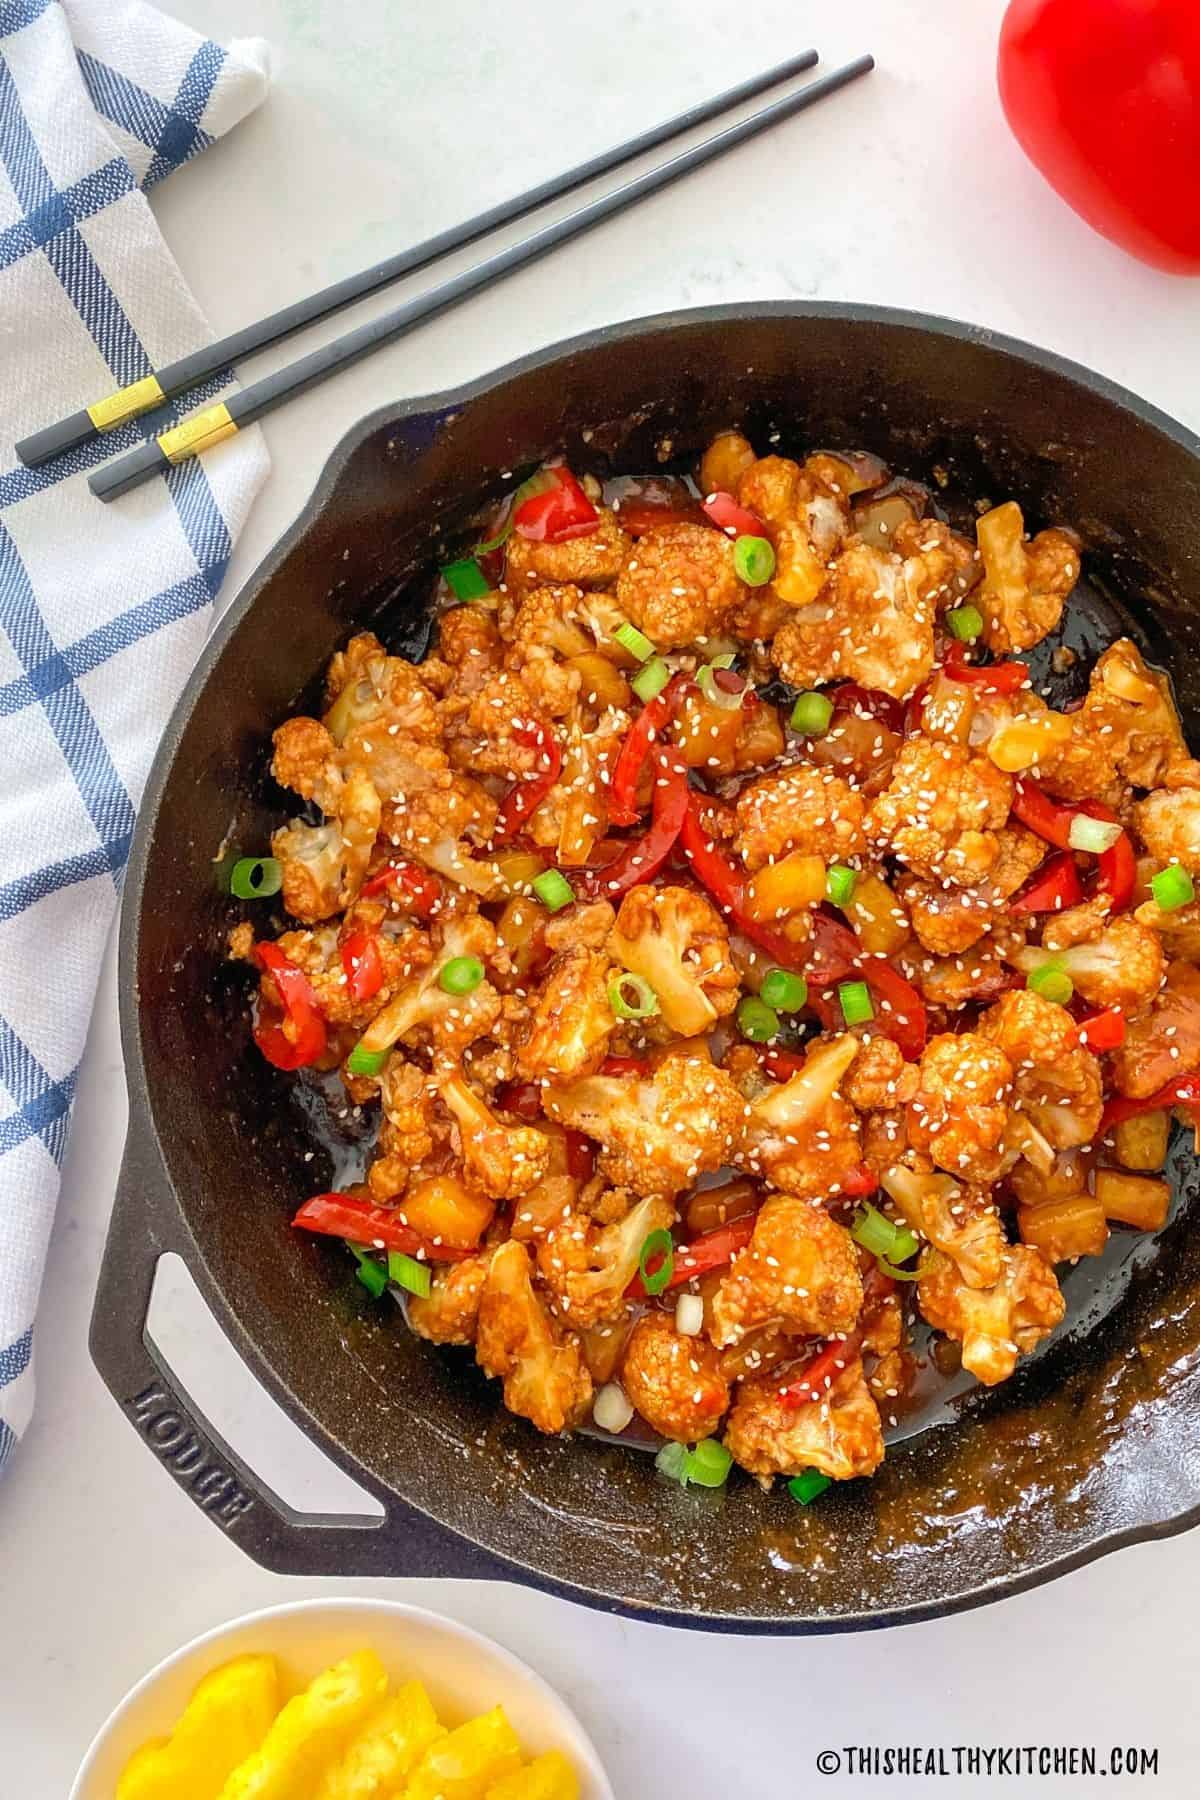
Garnish with thinly sliced green onion or chives and sesame seeds before serving.
Variations
- Make it spicy and add 1-2 teaspoons of sriracha or red pepper flakes to the sauce.
- Serve it as an appetizer on a party platter to enjoy like sticky “wings” or try our crispy Buffalo cauliflower wings.
- Swap the cauliflower for crispy tofu or tempeh, or you may even use broccoli florets to change it up.
Storage
This dish tastes best when freshly made, however, leftovers will keep in the fridge for 3-4 days. Reheat on the stovetop for quick reheating. Or use your oven or toaster oven to restore some of its crispy texture.
I don’t recommend freezing.
Expert Tips
- Do not dump the cauliflower onto the baking tray once coated with the batter. You don’t want any excess batter on the tray, or it will stick to the tray, and pieces may stick to one another, reducing its crispy exterior.
- Take the time to place the battered cauliflower in a single layer, one piece at a time, with plenty of space in between each one for the best results.
More vegan cauliflower recipes


If you tried this recipe, please let me know about it in the comments below. I always love hearing from you! Don't forget to Subscribe to This Healthy Kitchen to be among the first to get my new recipes! You can also FOLLOW ME on Facebook, Instagram, Pinterest and Twitter to see more delicious food and get all the latest updates.
Buon appetito
Rosa
📖 Recipe
Ingredients
For the cauliflower
- 4 cups cauliflower florets approx. 1 small head cut into bite sized pieces
- ½ cup brown rice flour
- 1 teaspoon garlic powder
- 1 teaspoon onion powder
- ½ teaspoon sea salt optional
- ½ cup water
For the vegan sweet and sour sauce
- ½ cup maple syrup
- ¼ cup rice vinegar
- ¼ cup low sodium tamari or soy sauce if not avoiding gluten
- ¼ cup ketchup
- 1 teaspoon garlic powder
- 1 tablespoon brown rice flour optional, to thicken sauce
- 1 red bell pepper sliced
- 1 cup pineapple cut into cubes
For Serving
- brown rice or quinoa
- green onion
- sesame seeds
Instructions
- Preheat your oven to 425 degrees F (218 degrees C) and line a baking sheet with parchment paper.
- Cut your cauliflower into small, bite sized pieces and set it aside. Then add the remaining cauliflower ingredients to a medium mixing bowl and whisk to combine, to make the batter. Place the cut up cauliflower bites into the batter and mix well to evenly coat the pieces.
- Arrange the coated cauliflower on your baking sheet in a single layer, but do not dump everything from the bowl. You don't want excess batter on the tray or it may stick together and prevent crispiness.
- Bake for 20-25 minutes, flipping once at the halfway point until desired crispiness is reached.
- While the cauliflower is baking, prepare the sweet and sour sauce. Whisk all the sauce ingredients (except the pepper and pineapple) in a small bowl or measuring cup and set aside.
- Then sauté the red pepper and pineapple chunks in a large skillet with a tablespoon of water or broth, to prevent sticking. Do so over medium high heat until slightly brown. Then reduce the heat to medium low and pour the sauce into the pan and simmer until slightly thickened, approx. 5 minutes.
- By now, your cauliflower should be ready. Add it to the pan with the sauce and gently mix to evenly coat each piece.
- Serve over rice or quinoa and garnish with sesame seeds and green onion.
Marty Roddy says
Loved this, made a few changes( can’t help myself) used chickpea flour, some vinegar with water….. and added cayenne pepper for zing….
crispy and tasy…….served with bok choy/brown rice
Rosa says
Thrilled you enjoyed it, Marty! Thanks for taking the time to leave a review. 🙂
Tony says
Yummo! This was a dinnertime hit – thanks Rosa! 😊
Rosa says
You’re most welcome! 🙂
Karen C says
This recipe is so good that I try to get it into our menu rotation every week. My family LOVES it. Thanks for another great recipe Rosa.
Rosa says
So happy to hear that Karen. Thanks so much for the review. 🙂
Sharon Altonen says
I made this for the first time and my husband loved it.
Rosa says
Yay! Glad to hear that.
Heather says
I love this recipe! Can I freeze leftovers? I know they will be a little soggy after thawed but, other than that, would it work? Thanks!
Rosa says
Hi Heather, if you don’t mind the change in texture, then no problem to freeze. So glad you’ve been enjoying!
Sarah says
Made this for dinner to top vermicelli noodles and between my husband and I, we ate it all! So delicious!!!
Rosa says
Thrilled you both enjoyed Sarah!
Lori Ann says
So very quick and easy. Well written instructions. If you have the parts/pieces pre-chopped (read “good meal planning) it’s on the table in 30 min with time to spare. I’ll use less maple syrup next time and add onions. Hubby LOVED it just as it was. Awesome recipe.
Rosa says
Thanks so much for the review Lori Ann, so glad you both enjoyed.
Robin says
Hi Rosa, looking forward to making this recipe. I like everything about it but would prefer using whole wheat flour vs brown rice flour. I do not have a issue with gluten. It should work just as well, do you think?
Rosa says
Hi Robin, I didn’t specifically try that, but I think it should work. I can’t guarantee without testing, so please report back if you try it.
Adele says
Could i use frozen cauliflower?
Rosa says
I didn’t try that, but please let us know if you do.