


Cauliflower buffalo wings are a little spicy, immensely flavourful and incredibly delicious. Crispy on the outside, tender in the middle, for the perfect game day snack and party platters. Bonus, make them in your oven OR air fryer. They’re not only vegan, but gluten free and oil free too.

This recipe was originally published in November 2018. It has been updated for content and photos.
Reader Feedback:
“I have tried a LOT of buffalo cauliflower recipes and this one is by far, the best I've ever had! Thank you!!” – Cheryl
Why you’ll love these
- They’re so close to the real deal! You’ll be pleasantly surprised by how good they are, I mean, truly, they are super tasty! Now to be clear, these are cauliflower buffalo wings, and no, cauliflower is not meat and does not taste like meat. You probably can’t fool your friends into thinking these are chicken wings. BUT, these “wings” are so so flavourful of their own accord.
- The calorie and fat content is MUCH lower than traditional wings. Plus, they’re baked (or air fried) and not deep fried, so they’re so much healthier. So they’re completely guilt free, even if you devour the tray all by yourself.
- It’s truly a recipe that everyone can enjoy. Whether you’re whole food plant based, vegan, vegetarian, gluten free, omnivore, or carnivore, you will love these. I’ve made them multiple times for meat eaters, and they are always a HUGE HIT!

How to make them in your oven
(This is a summary with step by step photos, full recipe measurements and instructions are in the recipe card below.)
Start by washing and cutting your cauliflower into small, bite sized florets. You want the size to be about the same as traditional wings.
Place the cut up cauliflower in a large bowl. (photo 1)
Combine the seasoning, brown rice flour and cashew milk (or plant milk of choice) and mix well in another bowl. (photos 2-3)
NOTE: If you’re not avoiding gluten, you may use white or whole wheat all purpose flour instead.
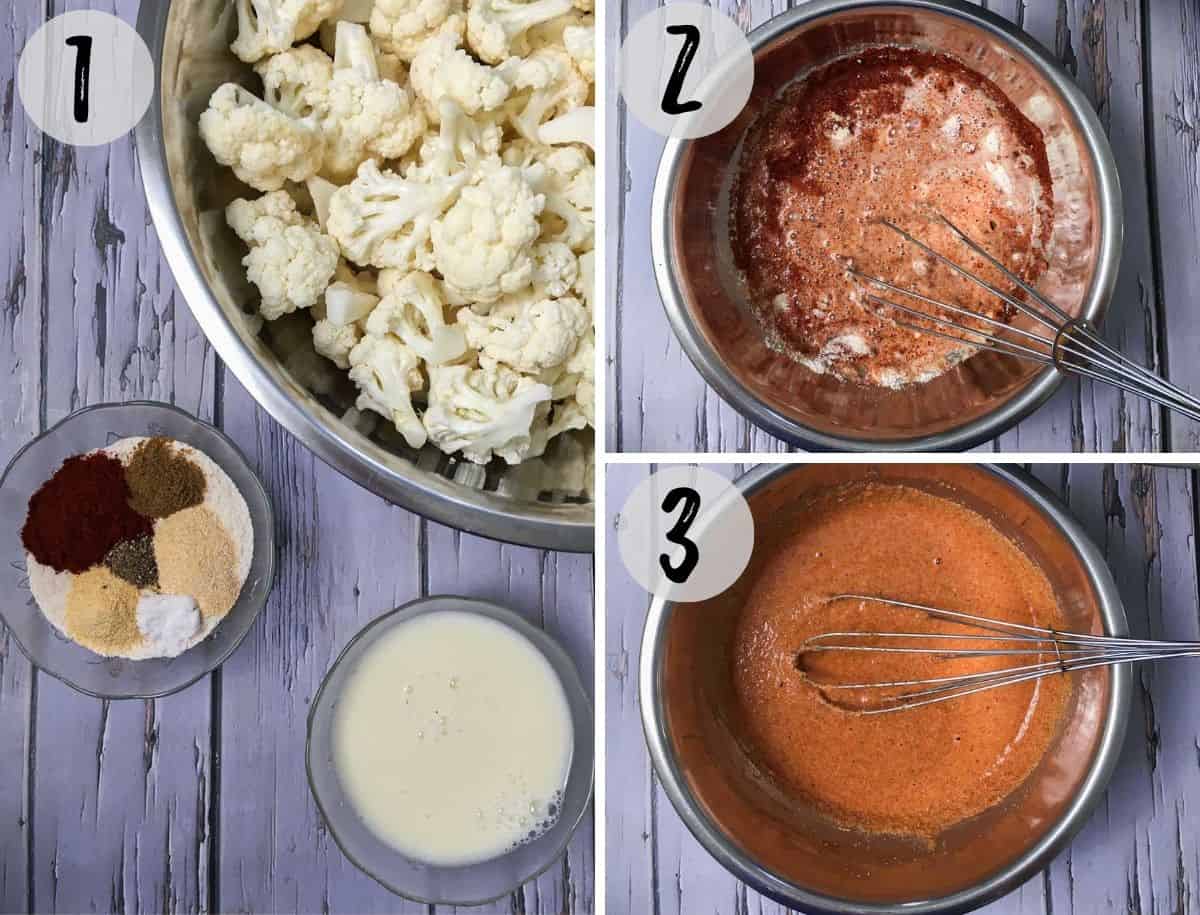
Pour the batter over your cauliflower bites and mix well until evenly coated. (photos 4-5)
Then place the coated cauliflower “wings” in a single layer on a large baking tray, lined with parchment paper. (photo 6)
NOTE: Don’t dump your cauliflower on the baking tray. If there is extra batter at the bottom of your bowl, you don’t want a pool of that batter on your tray. Place them on your tray one at a time, with plenty of space in between to prevent them from sticking to one another.

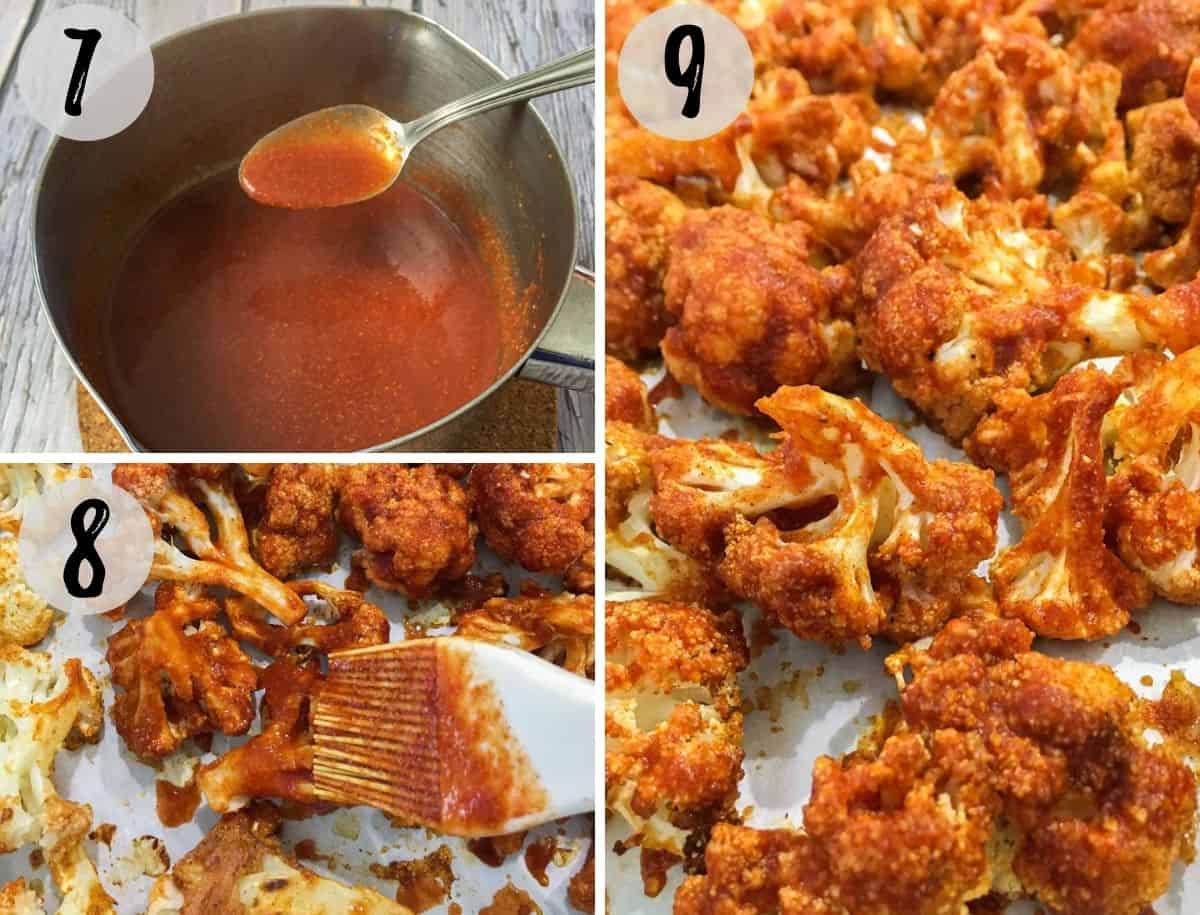
Bake for 20 minutes in your preheated oven, flipping once at the halfway point, and while baking, prepare your vegan buffalo sauce in a small pot. (photo 7)
Remove the cauliflower from the oven and coat your “wings” with the buffalo sauce. Use a silicone brush to evenly coat them with the sauce. (photo 8)
Return to the oven for another 10-15 minutes, flipping once around the halfway point. (photo 9)
NOTE: Although tedious, flip each of your cauliflower buffalo wings individually, for a crispier coating.
Serve your vegan buffalo cauliflower with carrots, celery and ranch dressing for dipping. Enjoy!

How to make them in the air fryer
(This is a summary with step by step photos, full recipe measurements and instructions are in the recipe card below.)
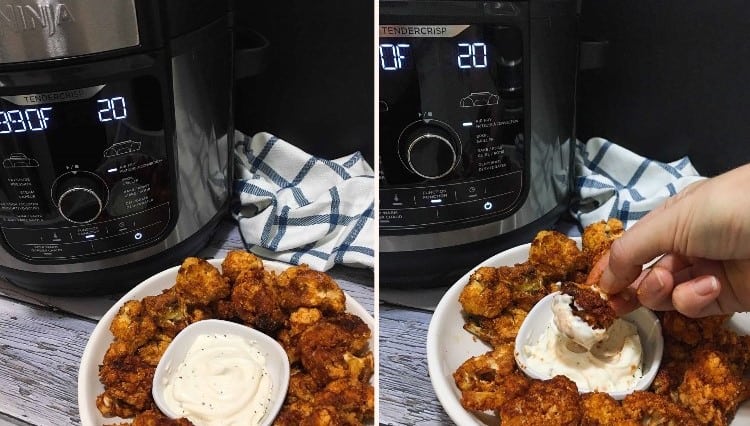
I’ve tested these in a Ninja® Foodi™ 8-qt and Cosori brand air fryer (see video below).
Prepare the same as you would for the oven method by making your batter and coating the cauliflower.
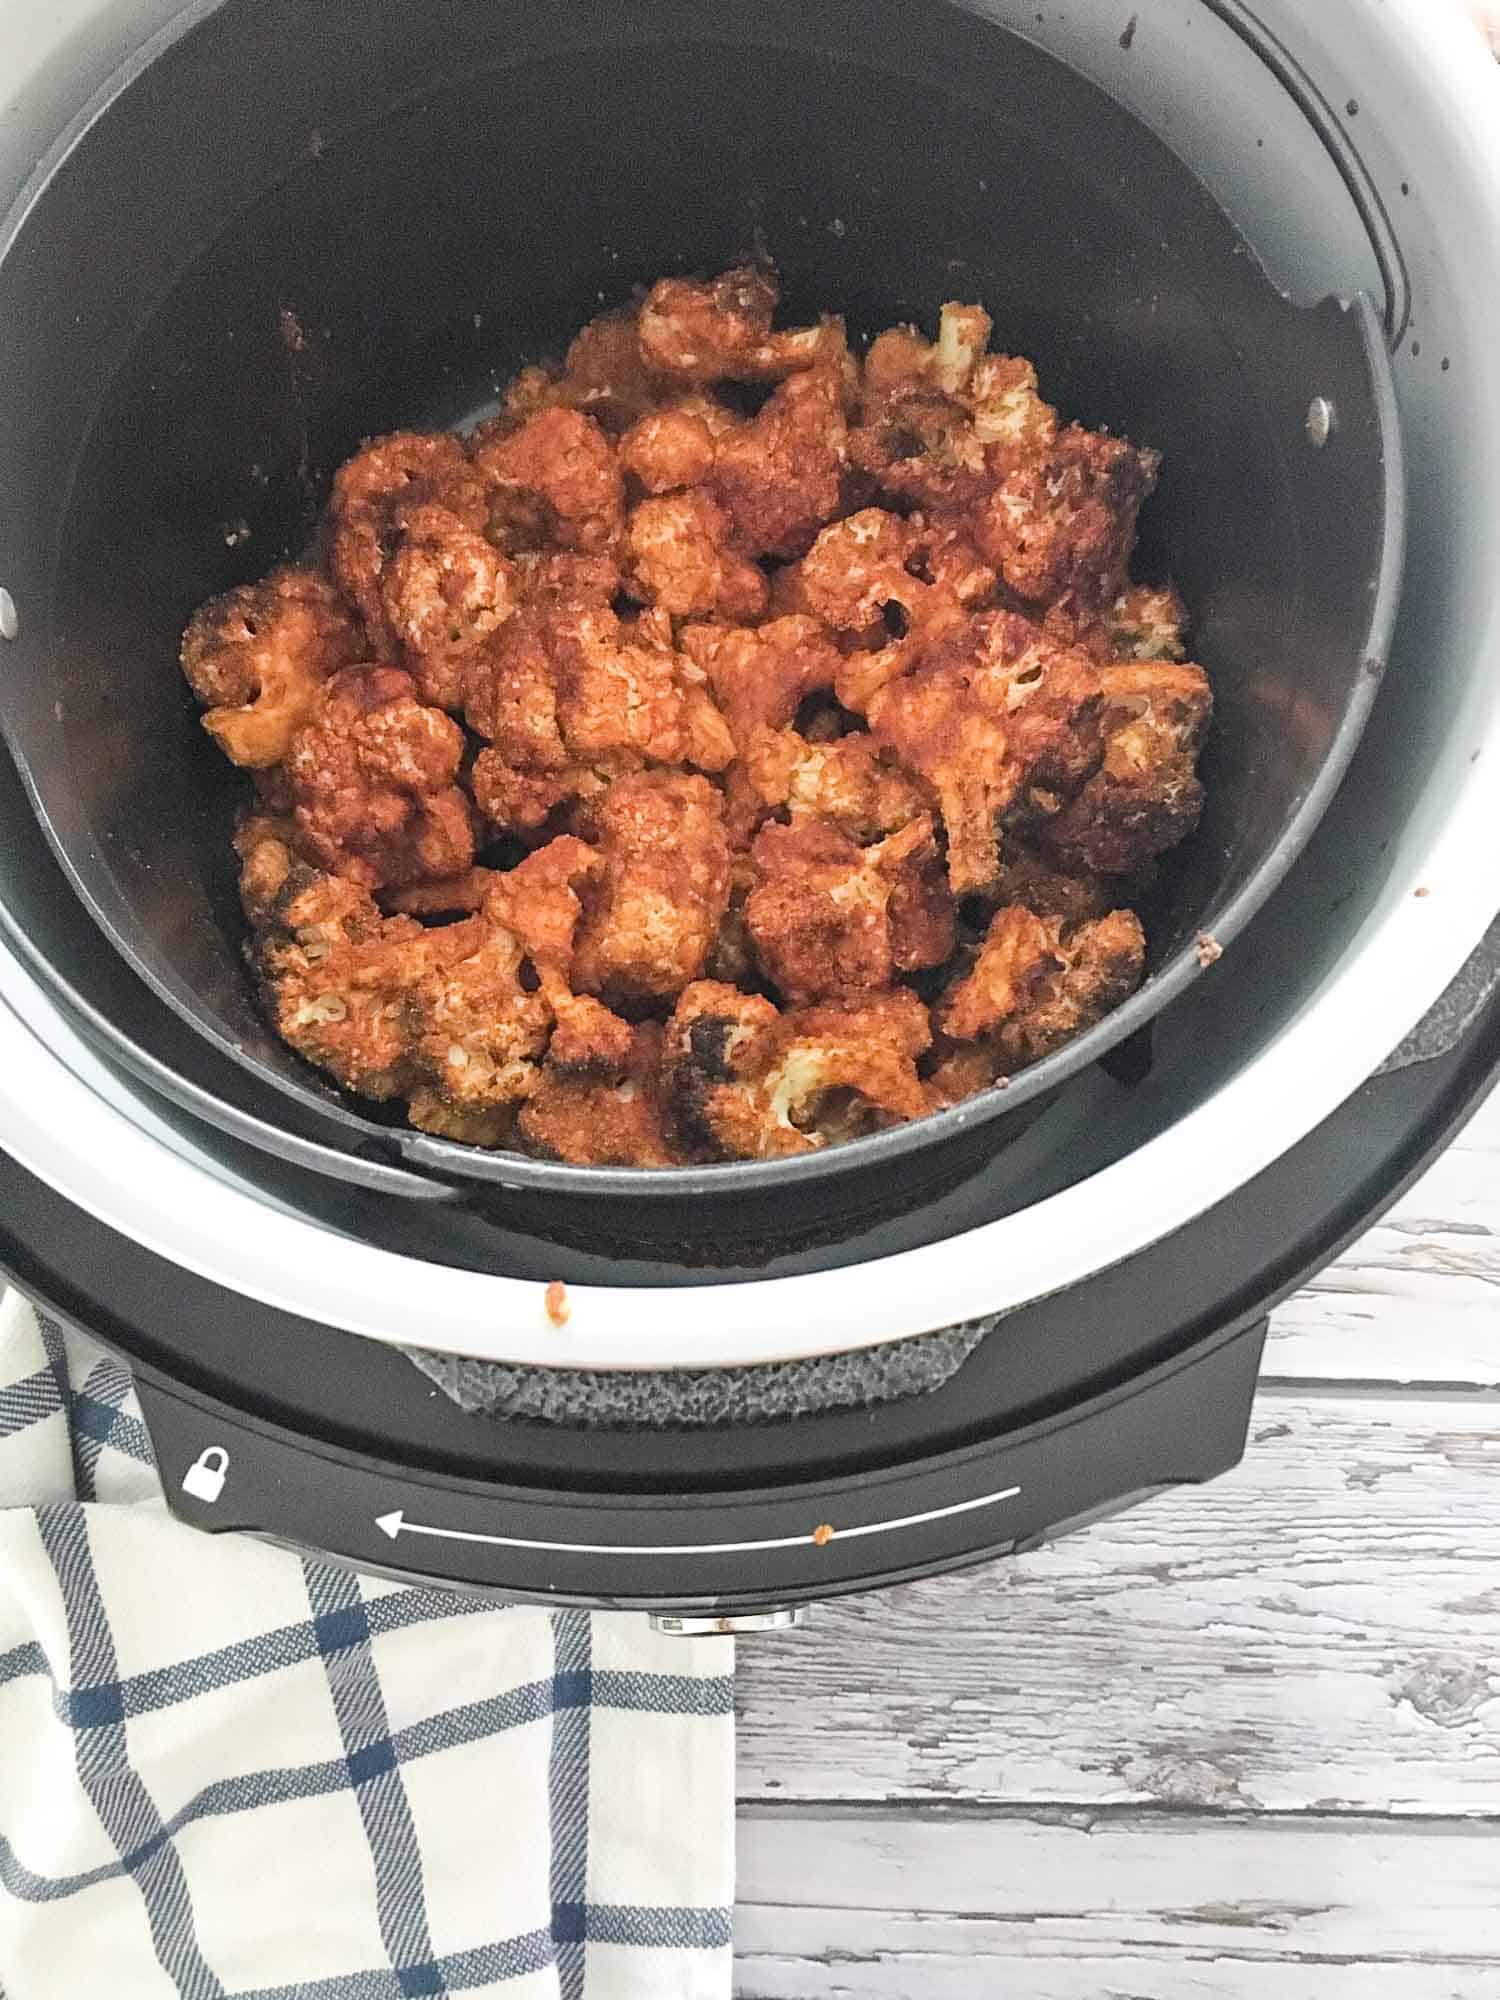
Then add your coated cauliflower into your air fryer basket. Set to 390 degrees F for 20 minutes, flipping once at the halfway point.
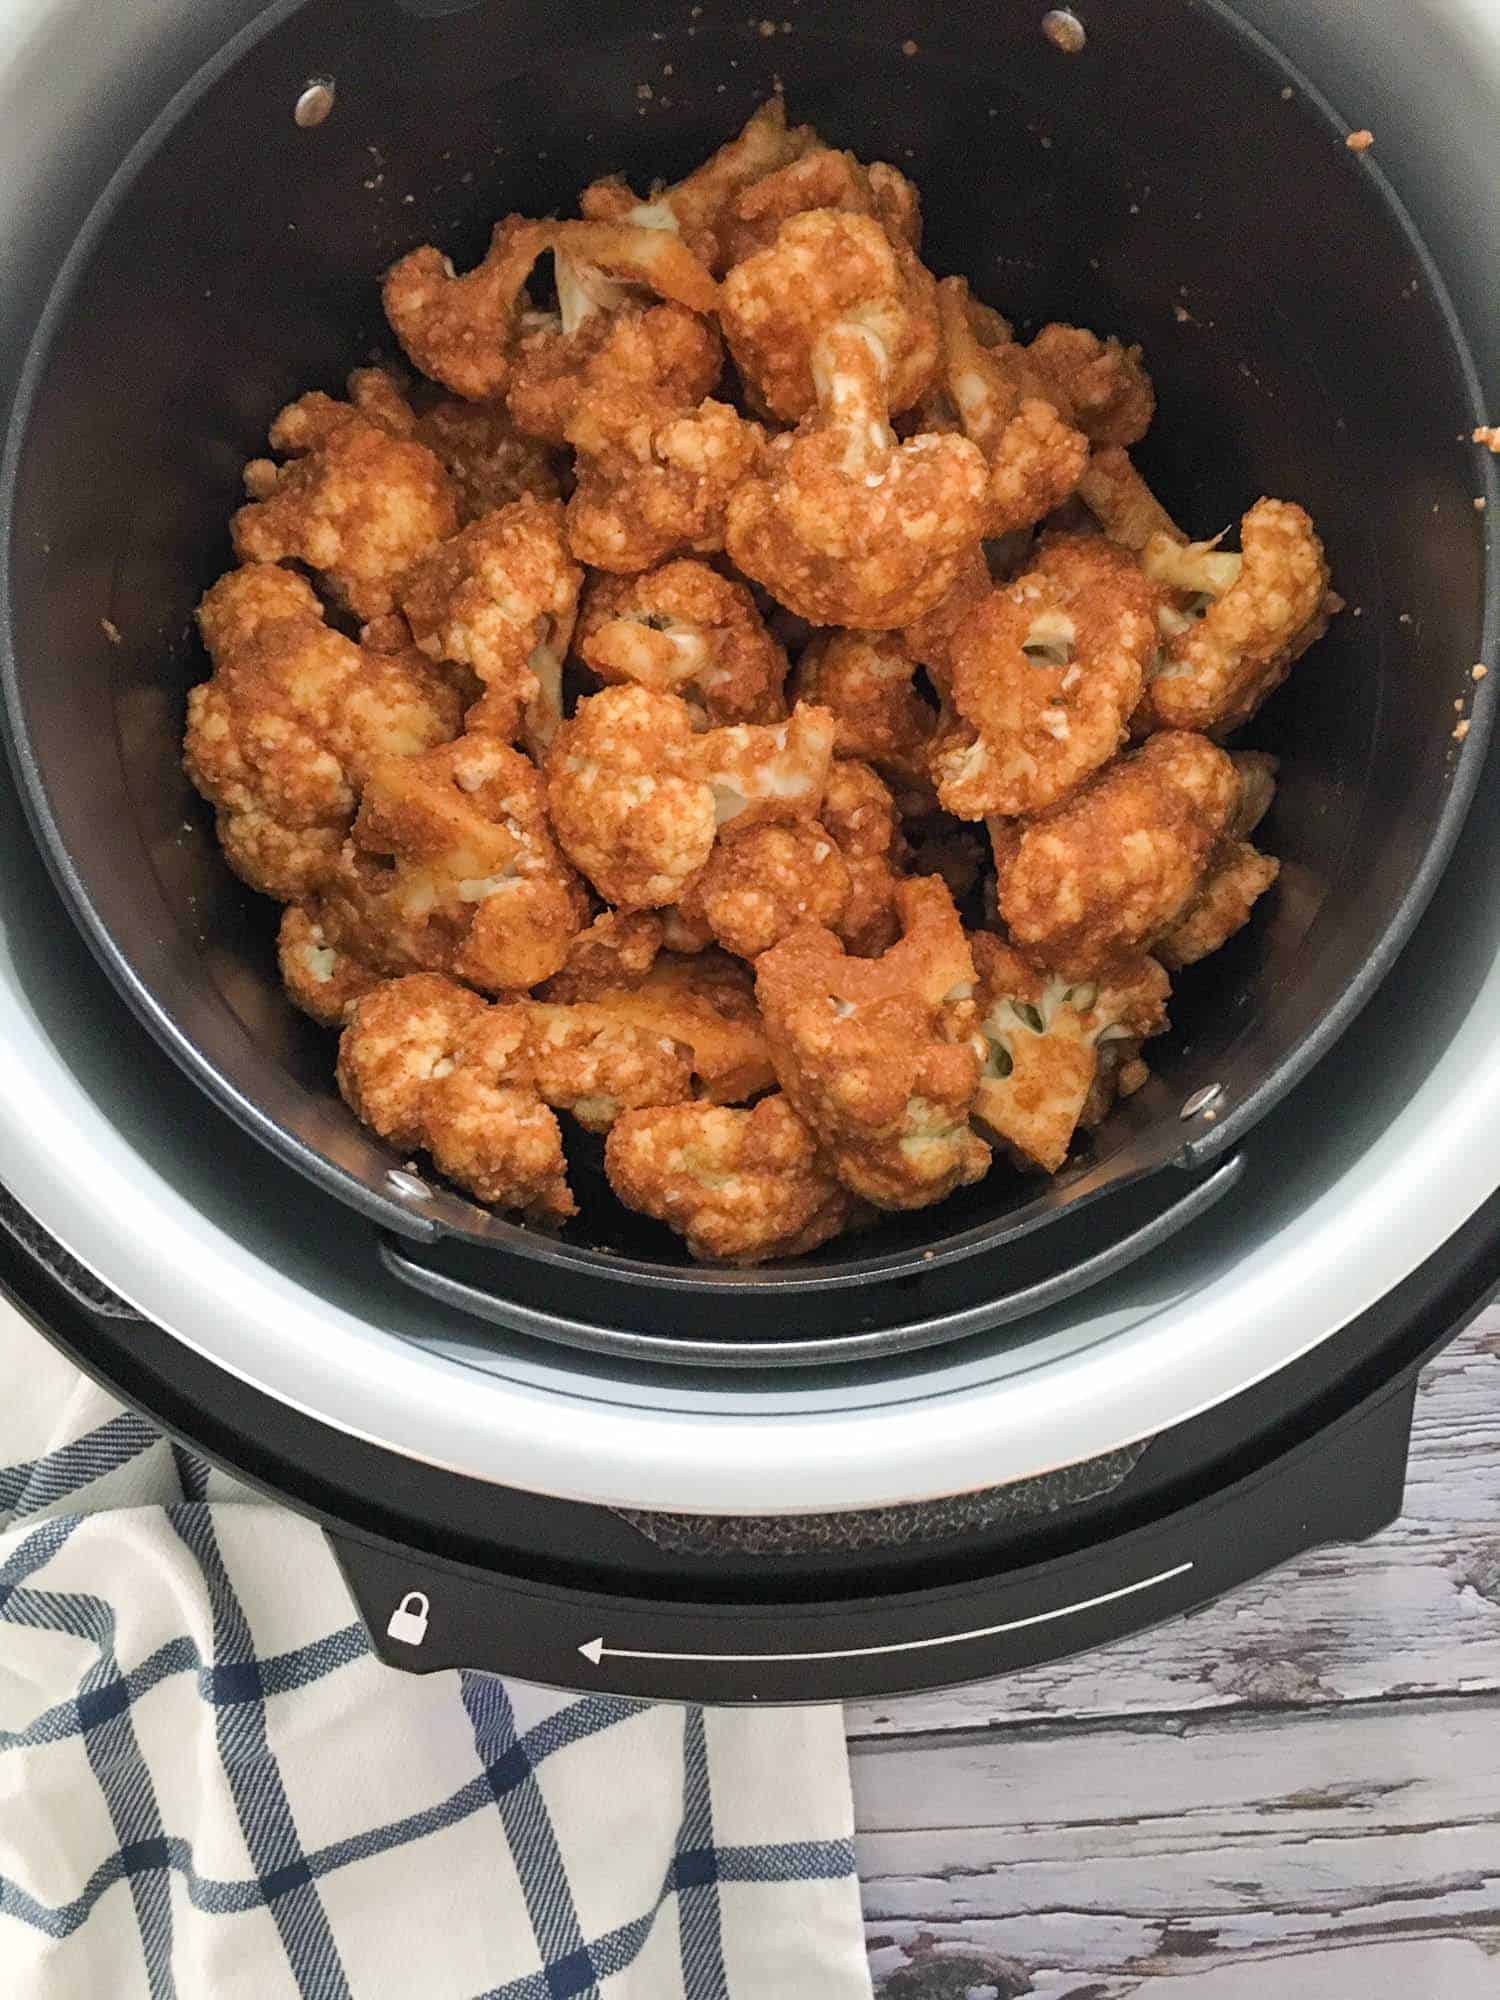
Give the basket a gentle shake to make sure nothing is sticking to the bottom, and then coat them in the buffalo sauce.
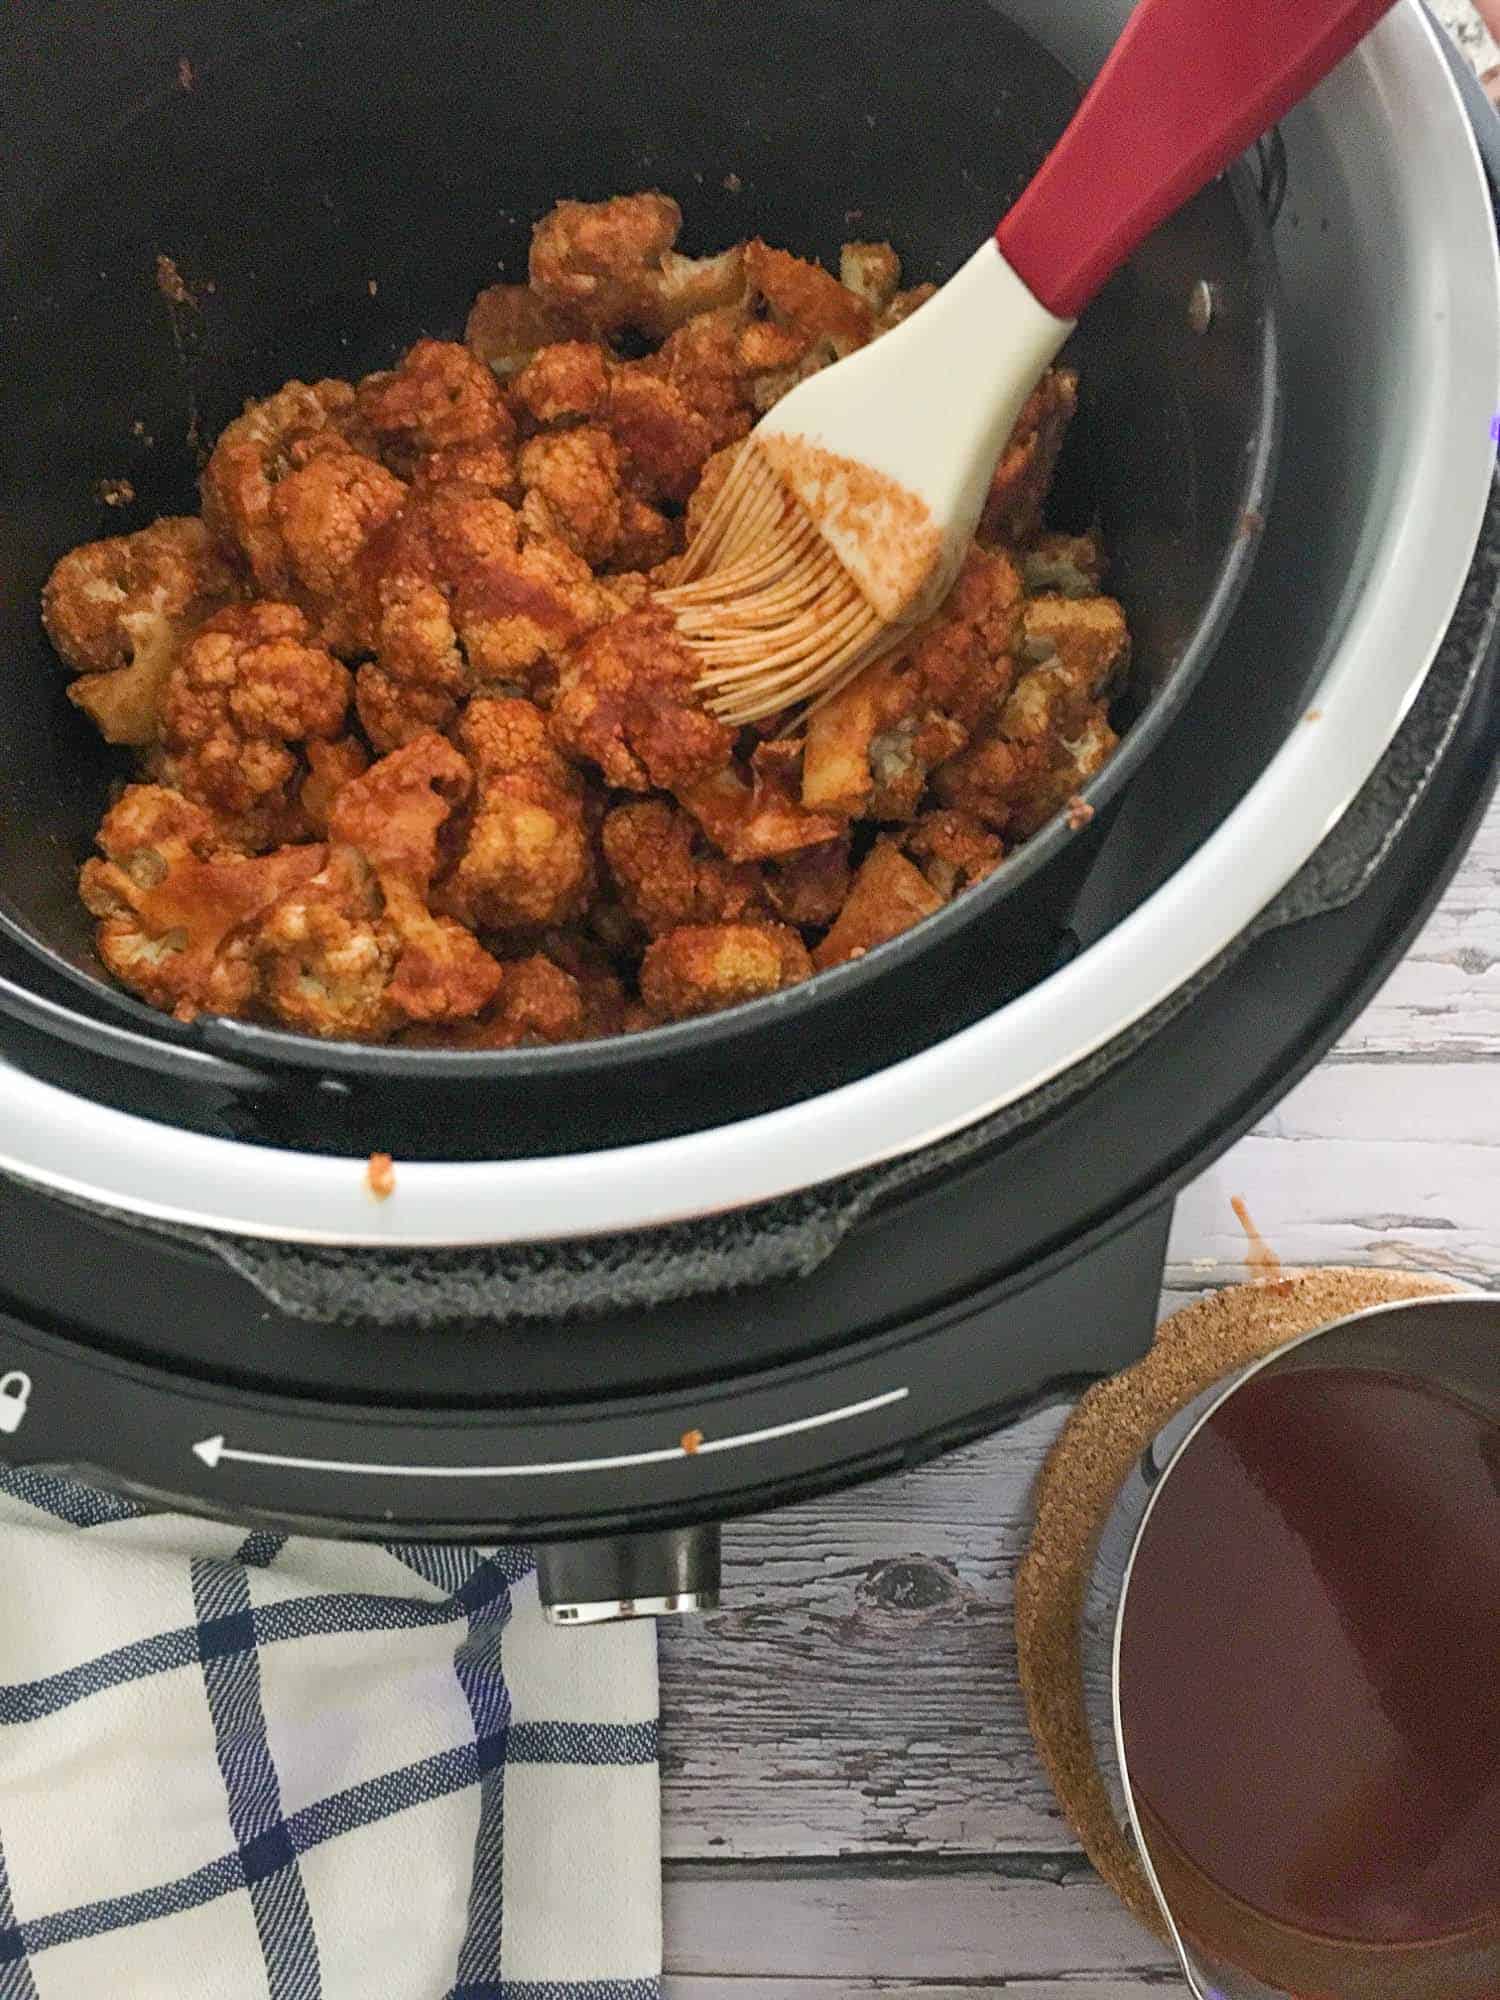
Now air fry for an additional 15 minutes, but start checking around the 10 minute mark. You want them crispy, but not burned.
The size of your florets will determine the final cook time.
Serve your cauliflower Buffalo wings with ranch and enjoy!
Common Questions
The good news is, no oil is needed! So you can keep this a healthy snack. Check out the expert tips for the best cauliflower buffalo wings below!
These really taste best when freshly made. However, you may keep leftovers in your fridge for 2-3 days.
Arrange them in a single layer in your air fryer, oven or toaster oven and warm them up at 350 degrees F until heated through.
Substitutions
- If you don’t require gluten free buffalo wings, you may use all purpose whole wheat or white flour, instead of brown rice flour.
- Use any plant milk of choice, avoiding cashew milk if you need these nut free. Soy, oat or rice milk also work. However, stay away from canned coconut milk, as that will be too sweet for this recipe.
- You may use store bought buffalo sauce to save time, if needed. Or you may also this this no cook, oil free buffalo sauce to change things up.
Expert Tips for the BEST results, every time!
- After coating your Buffalo cauliflower wings in the batter, do not dump them onto your baking tray. Excess batter at the bottom of the bowl will pool on your tray, causing the bites to stick together, and stick to the parchment paper. This will make them less crispy.
- I know it’s tedious, but for best results, place your vegan buffalo wings on your baking tray, one piece at a time.
- Make sure your vegan buffalo wings are in a single layer, with space in between each one. This will help crisp them up more.
- Flip your cauliflower at the halfway point of the first AND second round (after coating in the Buffalo sauce) of baking. This helps get the most crispiness out of these delicious buffalo bites.
More favourite “snacky” recipes!


If you tried this recipe, please let me know in the comments below. I always love hearing from you! Don't forget to Subscribe to This Healthy Kitchen to be among the first to get my new recipes! You can also FOLLOW ME on Facebook, Instagram, Pinterest, and YouTube to see more delicious food.
Buon appetito
Rosa
📖 Recipe

Equipment

Ingredients
- 1 small cauliflower cut into small bite sized florets
- ½ cup brown rice flour or flour of choice if not avoiding gluten
- 1 teaspoon garlic powder
- 1 teaspoon onion powder
- 1.5 teaspoon paprika
- ½ teaspoon cumin
- ½ teaspoon sea salt
- ¼ teaspoon black pepper
- ¼ teaspoon cayenne pepper
- ¾ cup unsweetened cashew milk or milk of choice
Buffalo Wing Sauce Ingredients
- ½ cup water
- ¼ cup white vinegar
- 1 teaspoon paprika
- 1 teaspoon garlic powder
- ¼ teaspoon cayenne pepper
- ½ teaspoon sea salt
- 3 tablespoon tomato paste
Optional Dipping Sauce (highly recommended)
- 1 recipe dairy free ranch dressing
Instructions
- If making the ranch dipping sauce, start by putting your cashews to soak before you begin prepping your cauliflower. Once soaked, prepare the ranch according to its directions and refrigerate until needed.
- Line a baking tray with parchment paper and preheat your oven to 450 degrees F.
- Place your cut up cauliflower in a large bowl. Then in a separate bowl, combine your flour and all the seasonings and mix to combine. Then add the milk and mix well to make your batter. Now pour the batter into your bowl with the cauliflower and mix well to evenly coat each piece.
- Place your coated cauliflower on your prepared baking tray, one at a time, in a single layer and bake for 20 minutes. Flip once at the halfway point.
- Meanwhile, prepare your buffalo wing sauce by adding all its ingredients to a small sauce pan. Whisk to combine and simmer over medium heat 3-5 minutes, allowing the flavours to combine.
- Remove the cauliflower from the oven, and coat the bites in your buffalo sauce. I use a silicone brush to brush each piece of cauliflower with a generous amount of the sauce. Then return to the oven for 10-15 minutes, flipping once halfway through.
- Serve with ranch and dunk away.
Air Fryer Instructions
- Place your cut up cauliflower in a large bowl. Then in a separate bowl, combine your flour and all the seasonings and mix to combine. Then add the milk and mix well to make your batter. Now pour the batter into your bowl with the cauliflower and mix well to evenly coat each piece.
- Place your coated cauliflower into your crisp basket, inside the Ninja Foodi appliance. Then set it to 390 degrees F and air fry for 20 minutes, shaking your basket every 5 minutes or so.
- Meanwhile, prepare your buffalo wing sauce by adding all its ingredients to a small sauce pan. Whisk to combine and simmer over medium heat 3-5 minutes, allowing the flavours to combine.
- Then use a silicone brush to evenly coat your florets in the buffalo sauce. Continue air frying for another 10-15 minutes, shaking or flipping your florets at the halfway point. Cook time will vary according to the air fryer model you're using and floret size.
- Serve with ranch and dunk away.
Video
Notes
Expert Tips for the BEST results, every time!
- After coating your Buffalo cauliflower wings in the batter, do not dump them onto your baking tray. Excess batter at the bottom of the bowl will pool on your tray, causing the bites to stick together, and stick to the parchment paper. This will make them less crispy.
- I know it’s tedious, but for best results, place your vegan buffalo wings on your baking tray, one piece at a time.
- Make sure your vegan buffalo wings are in a single layer, with space in between each one. This will help crisp them up more.
- Flip your cauliflower at the halfway point of the first AND second round (after coating in the Buffalo sauce) of baking. This helps get the most crispiness out of these delicious buffalo bites.
Denise says
Delicious! Whole family enjoyed this one 👍
Rosa says
Wonderful to hear. Thanks Denise! 🙂
Lori says
Love these! 👍 They’re easy, perfectly spiced, and the rice flour is great for adding that bit of crispy texture you want. Thanks!
Rosa says
Yay! Thanks so much for the review Lori. Thrilled you enjoyed these. 🙂
Karen Ricketts says
This is the best Cauliflower Wing recipe, and we’ve been on the hunt for a good one. Great batter, nice bite to the sauce – great recipe that we’ll be making again.
Rosa says
Thanks so much Karen. Thrilled you enjoyed these.
Sarah says
This recipe is absolutely yummy! I have a question though. Your photos show the cauliflower getting all crispy, but when I do it, my cauliflower gets stuck to the parchment paper and isn’t nearly as crispy as I think they should be. Is there a trick to keeping the batter from sticking to the parchment paper? I’m using ww flour and soy milk if that makes a difference. Thanks!
Rosa says
Hi Sarah, so glad you like them! Some tips to get them crispy:
– once coated don’t dump the cauliflower on your tray. Any excess batter at the bottom of the bowl will cause the cauliflower to stick to the parchment paper and adds too much moisture. So, although tedious, for best results, place them one by one on your baking tray.
– make sure they’re in a single layer and not touching each other. A bit of space in between helps maximize the crispiness.
– flipping them individually at the half way point of the first round of baking, and again at the half way point of the second round (after coating in the buffalo sauce) really helps too!
Hope that helps, and thanks for the feedback.
Laura says
Yummy!
rosa says
Thanks Laura! 🙂
Michelle says
I would love to make these, but I do not have an air fryer. What would be the oven temp and how long would you cook the cauliflower? TIA
rosa says
Hi Michelle, the original directions are for baking these in the oven. If you look at the recipe box, the ingredients are listed and then “instructions” will be the oven instructions, followed by the air fryer instructions below that. Hope you enjoy! Please report back when you try them. 🙂
Michelle says
Oh gosh! I feel silly, I totally did not see the oven baking instructions above. Thank you! Can’t wait to try these!
rosa says
No problem Michelle, enjoy!
Malini says
Hello, any sub for tomatoe paste? Not sure if that is healthy? All other ingredients look great, very excited!
rosa says
Hi Malini, tomato paste ingredients should just be tomato & water. You may skip it if preferred, but it will change the thickness of your sauce. Hope you enjoy.
Allison says
Delicious! Baked these, also used Frank’s Red Hot rather than your buffalo sauce for convenience – served with your ranch! Thank you!
rosa says
Thanks for the feedback Allison, so glad you enjoyed! 🙂
Shauna Kato says
These tasted excellent! I used Frank’s Original hot sauce instead of making my own, and I also mixed everything together in a bag, which made it even easier than it already was. Definitely something I’ll be making again!
rosa says
Thanks for reporting back Shauna! Glad you enjoyed these and thanks for sharing your process.
John says
These were amazing, will make again, thank you!
rosa says
You’re welcome John, glad you like them!